Showing posts with label Brown Bess. Show all posts

Saturday, March 30, 2019

Brown Bess Flash Guard Removal

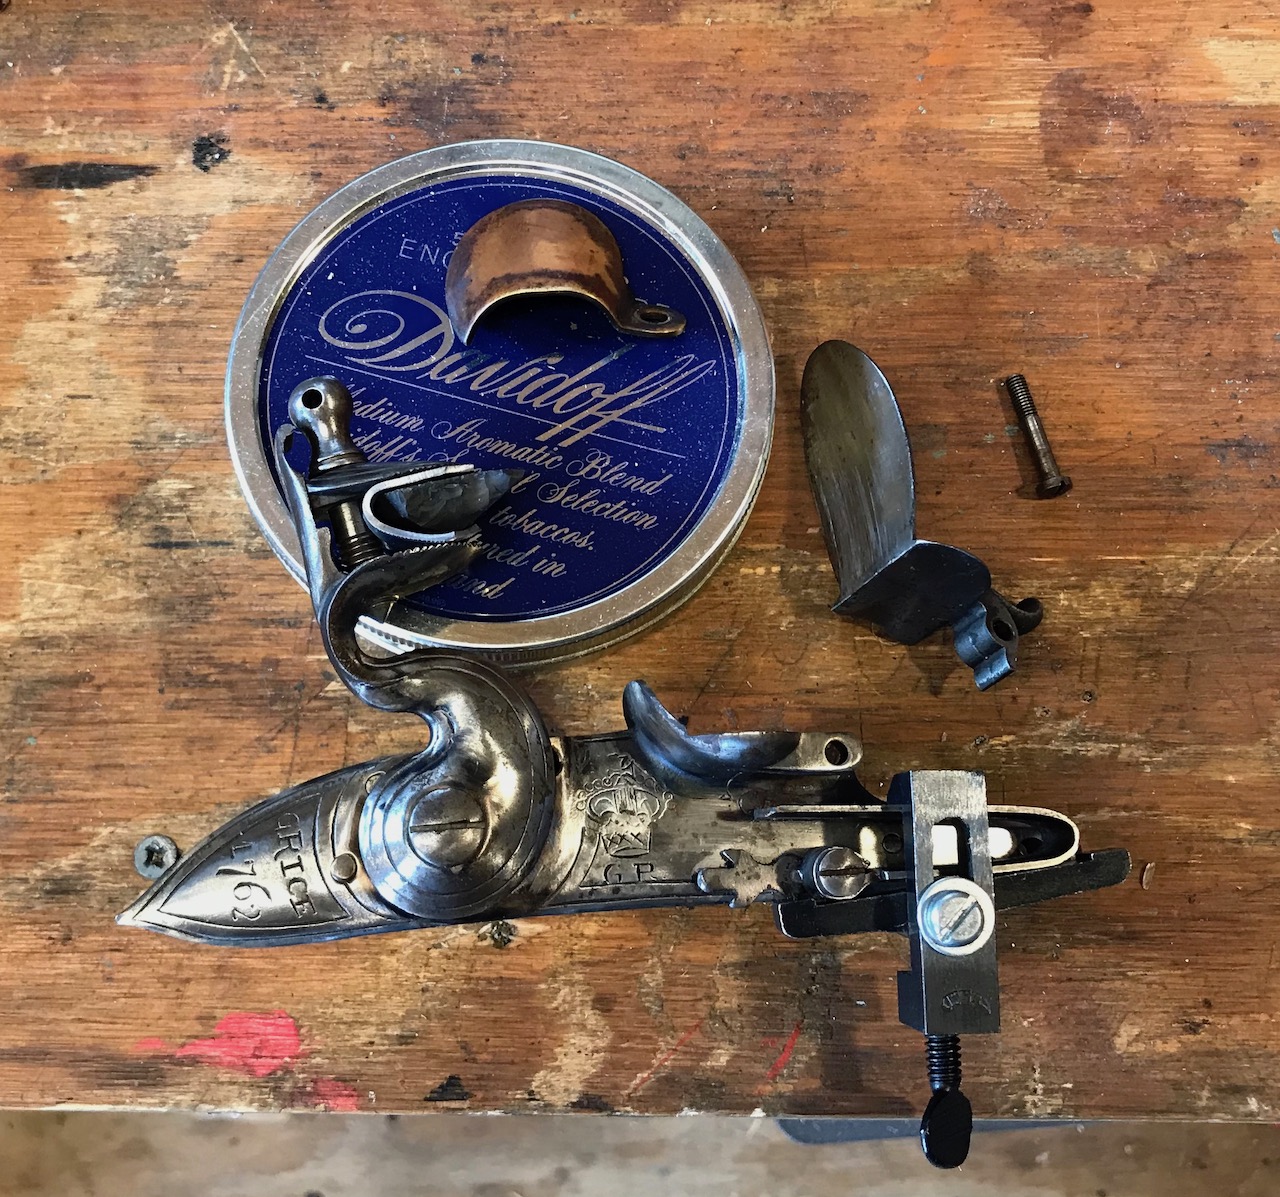
Today I removed the flash guard that came on my Pedersoli Brown Bess Carbine's lock. Flash guards are used on flintlocks by reenactors to protect the man to their right when firing in formation. As I am not a reenactor, it's unneeded. Further, it makes the lock harder to clean and directs a lot of fouling down alongside the side of the gun.


Because the frizzen is spring loaded no matter which position it's in, I needed to compress the frizzen spring to facilitate removal. In the picture you can see how I used my RMC mainspring vise for this. I bought it from Track of the Wolf and it's come in handy working on several flintlocks that I own.

You may also notice that I now have the flint wrapped in a piece of 1/16" sheet lead, rather than leather. The flint kept loosening when I shot the gun last weekend. This allows me to really clamp down on it and I'm hoping this will fix that problem. Using lead instead of leather for this was common on military flintlocks of the 18th and 19th Centuries. I bought the lead sheet from Rotometals, via Amazon Prime. I figure the foot square sheet of lead will last me the rest of my life, and I can always melt it down for bullets.

Note: I really should have removed the flint from the hammer before doing any work on the lock. Had it tripped, it could have caused a really nasty wound. Do as I say, not as I do.

Sunday, March 24, 2019

Pedersoli Brown Bess Carbine Range Report

So I shot the Bess carbine today.

My first shot was a patched 0.735 ball. That’s a VERY tight fit so if I shoot any more of them, I’ll try them bare. Some smoothbore shooters do well with an over-power card or wad, bare ball, and an over ball card to hold it in place. I also have some 0.710 balls which should be easier to load with a patch, but I didn’t bring them today.

I put around 15 rounds of the paper cartridges with .690 balls through the gun. The last loaded nearly as easy as the first. I noticed that after about 10 shots there was a crud ring forming in the breech so it required extra pressure to fully seat the ball. I really liked loading from paper cartridges. I’m going to make up some for my fusil de chasse.

Compared with my longrifle, it has a much slower lock time, so follow through is even more important for good shooting.

I had a number of misfires due to lack of spark. I think what was happening was that the top jaw screw would loosen, because when I tightened it back up the gun would alway off. Obviously I need to fix that.

Recoil was noticeable but not bad.

Video:


Saturday, March 23, 2019

Made Up Some Musket Cartridges Today

I'll be shooting my Pedersoli Brown Bess carbine for the first time tomorrow so I made up some ammunition today.

The paper cartridges are rolled around a form to create a tube holding the ball and powder charge. Most people use a dowel for this but I have a metal lathe, so I  made the form from a piece of 3/4" aluminum rod turned down to .69”.  (Besides, it's been too long since I made some chips.)


I put a cavity on the end to help keep the ball in place when I’m rolling the cartridges.


Recipe:


  • .690 ball by Rush Creek.
  • 100 grains 2Fg Goex black powder. The original British service load was up to 165 grains of 1Fg powder, some of which was used for priming. I’ll prime from a flask. By most accounts, you get better accuracy from a smoothbore with stout loads.
  • I used printer paper since it's what I had on hand.


Rather than tying the end I use a glue stick on the diagonal edge and ball end. As I understand it, French musket cartridges were made with glue while British rounds were tied.

I used this template, which I found after watching this excellent video by Tim Brieaddy:


Starting to roll the cartridge. At this point, I've gone over the diagonal edge with the glue stick.


Rolled almost all the way.


Forming the end.


Twenty five rolled cartridges, ready to fill.


Crimping the end and creating the tail that will be bit off prior to loading the musket.


And finally, a box of 25 ball cartridges.


I'll be going to a friend's place tomorrow to try them. I'm also bringing some loose .735" balls, powder, and patches to try patched round ball loads.

Range report to follow.

Saturday, March 16, 2019

Pedersoli Brown Bess Carbine

I could probably use an intervention. :) I went up to Dixon’s today and he had a used Pedersoli Brown Bess carbine on the rack at a price too good to pass up — $750. By contrast, Dixie Gun Works catalogs this gun at $1495.

The barrel had some rust along the wood line and a little under the stock in the groove around the breech. It looked like water had run down at one time and not properly dried before rust set in. It cleaned off with a bit of WD40, steel wool, and elbow grease. The lock is in fine shape and sparks well.

The sling swivels were added by the previous owner. Unfortunately, the upper swivel is just attached to the wood and if it drops can foul the ramrod. I may relocate it further toward the muzzle so that it falls on the upper ramrod pipe, and add a lug to the barrel so that it isn’t just held to the stock.


This isn't a replica of any original gun. Although the British did issue carbines in the 18th Century, this is basically a factory-chopped Second Pattern Brown Bess. Original Artillery carbines, for example, had a 39" barrel and were of .65 caliber rather than .75 as this is.

It should be an excellent shooter.


Sunday, February 24, 2019

Post-Cleaning Borescope of the Brown Bess

I ran out to Lowe's yesterday and bought a 5 foot section of 2" PVC pipe, and a couple caps. After degreasing the barrel, I soaked it overnight in Evaporust inside the pipe. After a little scrubbing this morning, this is what the inside looks like:


It's looking a lot better.

Saturday, February 23, 2019

More Work on the Brown Bess

I've been doing some restoration work on the Brown Bess over the past few days.

I determined the reason that it's not going into full cock is that the sear spring is not applying pressure to the sear after it rotates a certain amount. Either the V of the spring isn't wide enough, the lower leg of the spring isn't long enough, or the sear is bent. I need to figure out how I'm going to fix it.

Today I removed the barrel to check for pitting under the wood line. It's not too bad.

This is the breech end. Note the Nepalese marking.


This is the worst of the pitting:


It's not very deep.

The barrel is currently soaking in Evaporust. After I get it out and get it wiped down, I'll borescope it again to see what the inside looks like.

Tuesday, February 19, 2019

Worked Some More on the Brown Bess

After letting the bore soak overnight I did some scrubbing today with a 12 gauge bore brush (which is undersized for the bore) and even wrapped some steel wool into the bristles. It's coming along and looks promising.

All the nasty brown scale shown in my video from yesterday is gone. The bore is rough but there do not seem to be any really deep pits. I've got it soaking in Kroil again for now. I figure that I'll wipe that out and use Evaporust.


Monday, February 18, 2019

Bore Scoped the Brown Bess

I ran my cheap USB endoscope that I got from Amazon down the bore and captured the video using Photobooth on my MacBook Pro.


It's downright crusty. The fuzzy bits are from cleaning patches.

This was after a couple oily patches and spraying some WD-40 down the tube. I almost got the rod stuck on the way out but managed to extract it. I now have the bore soaking in Kroil, pending the use of a brush and/or Evaporust.

East India Pattern Brown Bess from the Nepalese Cache

Meet my latest acquisition, an East India Pattern Brown Bess musket from the Nepalese Cache. I ordered it last week from International Military Antiques, and it arrived today. Click the pictures for a larger version.


The stock is newly made.

This one has a Gurkha-marked lock.


Inside of the lock:


The ramrod pipes, nosecap, and bayonet lug/front sight:


The sideplate:


I also got a combination tool to go with the musket:


Overall it seems to be in pretty decent shape for a military gun that is nearly 200 years old. The lock does need a little work. It will hold on half cock but the sear doesn't want to move and engage the sear on full cock. It may just be a bit gummy or the sear spring may need work.

The part of the barrel visible above the line of the wood is not overly pitted. I plan to dismount it from the stock to check its condition there. The bore is rusty. I ran some patches soaked in WD-40 down the barrel but I'm planning to soak it in Evaporust.

Once I get the lock to hold full cock I'll be able to test for spark. The frizzen looks to be in good shape. After I confirm spark, I plan to remotely test fire it using some cannon fuse.

More posts to come.