Showing posts with label gunsmithing. Show all posts

Thursday, March 05, 2026

Ruger Single Six Magnum Vaquero

Several years ago I got this Ruger Single Six Magnum Vaquero chambered for .32 H&R Magnum.  Because of the color case hardening and the faux ivory grips, I nicknamed it the "Cowboy Pimp Gun."


TBH, I haven't shot it a lot because typical .32 H&R loads with 85 - 100 grain bullets shoot low and I didn't want to file the front sight shorter to raise the point of impact. It also had a really stiff trigger. I recently remedied both of those issues.

To fix the heavy trigger pull I got a spring kit from Wolff Gunsprings, which included a reduced power trigger spring and several hammer springs. I installed the Wolff trigger spring and replaced the factory 23 lb. hammer spring with an 18 lb. spring. This is a major improvement giving the gun a light trigger pull. I don't have a trigger pull gauge so I can't really say what it is now.

To raise the point of impact I loaded up some 120 grain cast RNFP bullets from Matt's Bullets over 3.2 grains of HP-38. They probably run around 800 FPS, but I can go up to 3.7 grains of powder. Because I wanted to ensure that the gun will reliably set off whatever ammo I put in it, I used CCI primers which are harder than other brands.

I brought the gun to the range today and did the Old West Shootist's drill, and was pleased that this load shoots to point of aim at 10 yards, and that it reliably set off the CCI primers.


I love it when a plan comes together. Now that I've got the issues worked out with the gun I expect to shoot it a lot more.

Sunday, June 30, 2024

Brownells Revolver Chamber Brushes

Cleaning the charge holes is an important part of maintaining a revolver. If you shoot .38 Specials in a .357 Magnum it's especially important to do so to knock back the crud ring that results. However, even using a bore brush this is a fair amount of work.

Brownells sells revolver chamber brushes for .38/.357 and .44/45. They are larger in diameter and longer than pistol bore brushes. This morning I used one when cleaning my S&W Model 64-2 snub .38.


(Yes, my workbench is cluttered.)

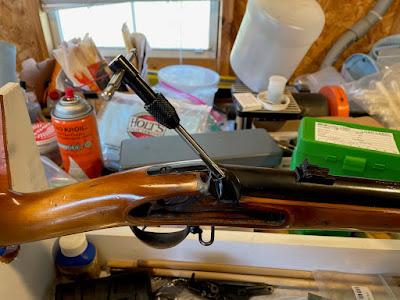
Note how much longer the chamber brush is than a bore brush. Also note that it's longer than the frame opening for the cylnder. Do not put the chamber brush down the bore because getting it back out is going to be extremely difficutl.

I ran the chamber brush dry through each charge hole once in each direction. It got rid of a lot of crud from the .38 Special 158 grain LSWC loads I fired yesterday.

Incidentally, after I finished cleaning the gun I replaced the wood grips and grip adapter with the set of Pachmayr Compacs it had when I got it. The Magnas with grip adapter were comfortable when dry firing but really whacked the inside of my left thumb when shooting the gun.

From last weekend:


The rubber grips are still pretty small so the piece should still conceal easily under a jacket or vest when Fall rolls around. This is a 6 shot K-Frame so it's not like I'm going to be stuffing this in my pants pocket, anyway.

Saturday, May 18, 2024

Smith & Wesson Model 640 Range Report.

I'm pleased to note that the gunsmithing I did on my S&W Model 640 I did this morning worked out. I took it to the range tonigh and put 50 rounds of my handloads through it. The loads were a 148 grain button nose, bevel base wadcutter from Matt's Bullets, 3.3 grains of Alliant Bullseye Powder, and CCI primers in Winchester wadcutter brass. The gun functioned perfectly.

Something to mention is that of the major American primer brands, CCIs have the hardest cups. So, if the gun runs well with them it should work fine with Federal (the softest), Remington, or Winchester primers.


Note that the reason I needed to work on it earlier today was because I'd installed an Apex Duty/Carry kit in it, which has a reduced power hammer spring and extended firing pin. (The kit also includes a reduced power rebound spring but I managed to launch that into the ether so my gun has the OEM rebound spring.) Even without the lighter rebound slide spring it's much easier to shoot well than as it came from the factory.

This is 50 shots at 7 yards. All of my shots were on the target.


This gun will definitely be carried.

Replacing the Hand Spring in a S&W Revolver

If you need to replace a hand spring in a Smith & Wesson revolver this video shows how:


In the video he used a dental tool to push the spring forward so that it's in the correct position relative to the hand. I found that a spring bar tool as used for changing watch bands worked perfectly. I used one that was included in this inexpensive kit.


Saturday, March 23, 2024

Painting Your Front Sights

Once you get north of 40 seeing the front sight on a pistol can become challenging. I'm in my second half-century so this has gotten even worse than it was for me in my forties.

If it's an older gun with either a plain black or worse yet, stainless front sight, it can be nigh impossible, especially if shooting indoors. If you can't replace the front sight or are unwilling to do so because of the gun's design or collectibility, painting it can make a big difference.

Several years ago I started out by painting the front sight on a couple guns white. This works as long as you're not shooting at a white target, at which point it's even worse than an unpainted sight. So, I picked up a set of Birchwood Casey Touch Up Sight Pens. The set came with three paint pens: white, red, and a lime green. The white pen was dead out of the box but the green pen is still going strong.

I first degrease the sight blade I want to paint, using rubbing alcohol. You can also use acetone. Wait for that to dry, then add a white base coat. Since my white pen was DOA I used white out correction fluid until I ran out, then I bought a bottle of white nail polish.

For example, here's the 1920s-vintage S&W Military & Police revolver I just got. The front sight is a thin half moon machined as part of the barrel.

First, the base coat:


(Sorry for the crappy focus.)

The white base coat helps the top coat(s) in green pop more. I generally use 2 or 3 coats of green, depending on how it looks. Make sure to let it dry thoroughly between coats.

Here's what it looks like with two coats of green. I'm going to add another.


White is very visible in the woods even at dusk but since I often shoot at white targets the green is a good compromise between maximum visibility in low light and usefulness against a variety of backgrounds.

I use this color combination on the percussion muzzleloader that I shoot in woods walks, on which I never know what color the targets will be painted. So far, so good.

Hoppe's No.9 will dissolve the paint but didn't seem to hurt the nail polish. Solvents like Ed's Red which contains acetone will dissolve the nail polish, as well.

The paint does wear off so I'm going to experiment with a clear top coat to hopefully protect the green and keep me from having to touch it up as frequently.

Note that I leave my rear sights black. Whether shooting a rifle or pistol, your focus should be on the front sight.

Friday, January 12, 2024

Got a Lathe Spider

A couple weeks ago I ordered a spider for my 7x14 minilathe, something I should have bought years ago. Little Machine Shop had it as their weekly special so I finally pulled the trigger on it.

Link to minilathe spider: https://littlemachineshop.com/products/product_view.php?ProductID=1136

The spider threads onto the end of the spindle and provides additional support to long workpieces, to prevent them from whipping around.


To install the spider you remove the gear cover on the end of the headstock and simply thread it onto the end of the spindle.


I used it today while drilling and tapping the flared end of the factory ramrod that came with my Investarm Gemmer Hawken. Even though I bought an unbreakable Delrin rod for it from Track of the Wolf, which is threaded on both ends, I want to keep the OEM wood rod as a spare.

This shows the ramrod mounted through the spindle bore.


And here I was using the lathe as a tapping guide to keep the 10-32 tap straight. I did not do this under power. Instead, I used the chuck key as a handle and rotated the chuck manually. Power to the lathe was off when I did this.


Aside from drilling and tapping the end of the OEM ramrod to accept 10-32 accessories like cleaning jags, worms, and bullet pullers, both ends of both rods got drilled and cross-pinned. To drill the holes I used my minimill.

Always cross-pin your ramrod tips! Failing to do so can result in the ends pulling off the rod if you get a jag stuck or need to pull a ball. It's simple to do so:

  1. Drill a hole through the rod crossways. I used a #40 drill because for my pin I used some brass rod 0.098" in diameter.
  2. Chamfer both ends of the hole.
  3. Drive the rod through the hole and cut it off. I used side cutters.
  4. Using a hammer, peen over both ends on a metal surface. I used the anvil on my bench vise.
  5. File the ends of the pin smooth.
One end of the Delrin rod from Track is tapped 10-32 and the other is 8-32. I will use 10-32 jags, etc. and have an aluminum T-handle with an 8-32 stud on the end. I have qualms about using it for cleaning or ball pulling.

Just another example of how my small, tabletop machines help me out with gunsmithing tasks.

Sunday, May 07, 2023

Made a Couple of Brass Drifts

This afternoon I went out to the shop and made a couple drifts from some square brass stock, for use with Colt-style percussion revolvers and also rifles on which the barrel is held on with a key or keys.


Naturally, I could have made these with a file but a milling machine, even a small one like my Grizzly G8689 makes it a lot easier. Don't ever let anyone tell you the table top machines are useless.


Sunday, April 30, 2023

Installing a New Front Sight on a Pietta 1851 Navy

Several years ago I bought a Pietta 1851 Navy Sheriff's Model .44 caliber percussion revolver. It's strictly a fantasy gun in that Colt never made an 1851 Navy with this short a barrel, nor did they make them in .44. All real Colt Navy revolvers are .36s, with the exception of a very few experimental .40 caliber guns. Regardless, it's a fun little gun but severely handicapped by the factory front sight, which is a miniscule brass cone that's both hard to see and too short, resulting in the gun shooting very high at pistol ranges.

So today, I fixed that by cutting a dovetail in the barrel and installing a taller blade front sight that I'll be able to actually see and also can file to zero the piece.

Here's what the factory front sight looked like, along with the rifle front sight I modified to use:


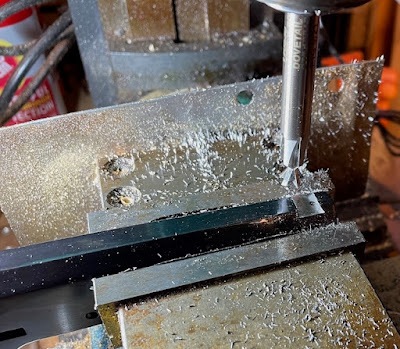
I have a Grizzly G8689 mini mill. I first used it with a 1/8" end mill to cut the old sight flush with the barrel. Then I cut a slot a bit less than the width of the top of the front sight base. I cut the slot 0.07" deep to match the thickness of the front sight. (The mill has digital readouts fitted to allow me to make precise cuts.)


Then I used a 3/8" dovetail end mill to turn it into a dovetail. You can see the factory hole for the original front sight in the dovetail.


Using a couple files and trial and error, I fit the new sight to the barrel.


I left it extra tall so that I can use a file to raise the point of impact to the point of aim. I'll probably zero it with a load of a .454 ball on top of 30 grains of 3Fg black powder. After it's zeroed I will shape the front of the blade and cold blue it.

Aside from the front sight I plan to slightly enlarge the rear sight notch in the hammer nose, and replace the factory nipples with Tresos that have small flash holes for less blow back and cap fragmenting. An accessory I plan to make is an extension to slip over the loading rod for better leverage. That's not needed on the full length guns but this will benefit from that. Those without machine tools can purchase one from Slix Shot.


Saturday, April 01, 2023

Enhancing my ramrod and short starter

The Delrin ramrod I put together for my California half stock rifle only had one threaded end on it. If I'm ever out in the field with the rifle and need to pull a ball that would be a problem, so today I added a tapered steel ferrule to the other end. It's threaded 8-32 to accept accessories, including this T-handle I have.


The T-handle also provides a better grip if I'm cleaning, the patch is too tight, and it gets stuck down at the breech.

While I was at it I also drilled a 5/16" hole about 1/2" deep in my short starter, so I can use it as a palm saver if it gets difficult to fully seat a ball due to fouling.


When adding a ferrule to the end of a ramrod it's very important to not only have a tight fit, but to glue and pin it in place. Otherwise, the odds are good that at some point it will come off, especially if you have a stubborn patch or are trying to pull a ball. I cross drill a hole through both the tip and rod after glueing the ferrule on, chamfer the ends of the hole, put a little glue in the hole, and drive the pin through. Then I cut it a little long and peen over both ends, and finally, file or sand it smooth.

Saturday, March 18, 2023

Borescoped my Zouave Rifle

Tonight I used my cheap USB bore scope to inspect the bore on the Zouave. It's in good shape for a 37 year old muzzleloader

This is the breech. The black spot at about 3:00 is the flash hole.


There is some minor surface rust about 6" above the breech face, but it's not bad.


After scoping the bore I ran some Hoppe's No.9 down and will let it soak until tomorrow.

On a Mac, PhotoBooth works to watch video as the camera goes down the bore and to grab stills. I didn't have to install a driver or any other software.

I bought the scope in 2017 from Amazon. The unit I bought is no longer available but they have an assortment of others. Mine requires the use of a USB A to USB C 3.1 adapter to work with my MacBook Air. It will not work with an Apple 3-in-1 dongle, but it works fine with this Amazon Basics model.

This model of borescope is very similar to mine but the connector is USB C, and it comes with a USB A adapter.

Zouave Maintenance

One of the risks you run when buying a used gun is that it will need mechanical attention. When I got a couple replacement nipples for the Zouave from Track of the Wolf I noticed that the threads on them were the correct pitch (M8-1mm) but the threaded portion was longer than the nipple that came with the gun. When I tried to install one it would not screw all the way in. When I looked inside the bolster it was evident that the threads needed to be chased.

I did not have an M8-1 tap or die so I ordered a set from Amazon Prime and it came today. When I got to working it was apparent that the threads were pretty well boogered but after awhile I was able to clean them up.


Aside from the bolster, the replacement nipples' threads could have been better so I chased them with the die that came in the set. To do so I held each nipple by its square shank in my vise and put the die in the holder from my big Harbor Freight set. Now they both screw in and out easily.

While I was in the bolster I also noticed that there was a crusty buildup in the bottom near the flash channel. That cleaned up using a small twist drill bit turned in my fingers.

Tomorrow I should get to shoot the Zouave. I'm bringing a variety of components: .562, .570, and .575 round balls, .575 Minie balls, and .018" and .020" patch material for the round balls.
Saturday, November 12, 2022

Coned the Muzzle of my Longrifle

Back in the 18th - 19th Centuries in the US, most rifle shooters did not use short starters. Instead, most rifles had internally coned muzzles. In other words, the muzzles were funneled so that a patched round ball could be started with thumb pressure, and then seated home with the ramrod. Eventually barrel coning fell out of favor but has been rediscovered in the past couple decades.

Cabin Creek Muzzleloading list barrel coning as a service. There are also a couple of tools you can buy that will allow you to do it yourself. I recently purchased one of these from Joe Wood, who posts under the name "flintsteel" on the Muzzleloading Forum. There is a thread about purchasing the tool, here.

I should note that when I mailed Wood my check he was away on vacation. He called to let me know that there would be a delay, and after he returned from his cabin he called to let me know that he was shipping the tool I ordered. I couldn't be more pleased with his service.

This morning I finally got around to using the Wood tool to cone the muzzle of my George Dech Pennsylvania rifle. This pic is a few years old, taken while hunting at my friend's land in Tioga County, PA.


The tool is a tapered brass mandrel that you afix a piece of wet/dry sandpaper to using carpet tape or an adhesive. I tried both and carpet tape is much better. I used three grades of paper: 220, 320, and 400 grit.

You will also need a tap wrench to use as a handle for rotating the tool. Wood recommends dismounting the barrel from the stock and rotating both the tool and the barrel simultaneously, in order to grind out the cone evenly.


Before starting I pushed a couple cleaning patches down the bore to a little below where the tool stopped, and left them there. This way they'd catch grit and metal particles and can be removed later with a patch worm.

The instructions state to periodically check your progress with a ball and patch. I used a .490 ball and dry 0.020" patch material. Once you can seat it with a dry patch about halfway it's done. However, I went further and can fully seat the ball. I did this because I want it really easy to seat, especially since I normally use 0.018" pillow ticking for patches, lubed with Track of the Wolf's Mink Oil Tallow, or October Country's Bumblin Bear Grease.

I wound up using three pieces of 220 grit, three of 320 grit, and two of 400 grit. The 220 is what does the bulk of metal removal while you polishing with the higher grits. After two rounds with 400 grit, the coned out area shined like a mirror.

Over on YouTube, Mike Beliveau did three videos on coning a rifle barrel with Joe Wood's tool and shooting it afterwards.


I recommend watching the first video before using the tool.

After I get to shoot the rifle I'll post a follow up.

Monday, October 03, 2022

Got the Lock Back from Cabin Creek Muzzleloading

I am really impressed with Brad Emig at Cabin Creek Muzzleloading. Last Monday, he received the Siler lock that I shipped him and he called me on Wednesday to let me know that it was fixed. The cost was more than I expected but the lock was a real dumpster fire inside, not just due to the tumbler I broke. He also had to replace the sear and bridle.

Brad shipped it back to me last Friday and I received it today. It looks great inside and after remounting to the canoe gun, it has a nice trigger pull.


I really couldn't be happier at this point.

Friday, September 23, 2022

Sent the Broken Lock Out for Repair

As mentioned in my last post, at this point I’ve decided to have a professional repair the canoe gun's lock, so I shipped the lock today Brad Emig at Cabin Creek Muzzleloading, which is just East of York, PA.  For lock repair he came highly recommended on the Muzzleloading Forum, and it’s nice that he’s relatively close.

Another reason I went with CCM is that I got a reply and a phone call very shortly after emailing him. I still haven't heard back from Jim Chambers Flintlocks. I called CCM this morning to confirm his shipping address and to ask whether I should include payment and Emig picked up the phone and was very friendly. He'll call me when it's done with the final cost and I can then either pay via a credit card or send him a check.

His base price for a lock tune is $95 + any parts he might need + return shipping.

It should get there Monday.

I’ve seen Emig’s guns at the Dixon’s Gunmakers Fair and they are gorgeous, absolute works of art (and priced commensurately).

And since the lock is a Siler, the other day I ordered from the Log Cabin Shop a large Siler flint and a vent liner to match the drum’s threads. Hope to get that next week.

Monday, September 19, 2022

Ugh, Canoe Gun NOT Fixed, and Other Stuff


Last weekend I was upstate at my friend's cabin. We had a good trip and I got to shoot the canoe gun a little. Unfortunately it is not fixed. The hammer stopped holding at full cock so I’m looking at sending it out for repair before I completely screw it up. Today I reached out to Jim Chambers Flintlocks, who is the current maker of Siler locks, to see if they'll service it. It's an older lock that may have been built from a kit so I'm not expecting a freebie. <grrr>

While it was still working, I patterned a load of 1-1/8 oz. of #5 shot on top of 70 grains of Goex 2Fg. This is a square load. I used a 1/8” lubed over powder wad, the shot inside a paper shot cup made from a Post-It note, and a thin over shot card. The target was at 15 yards and POA was center hold.


The SR-1 target I shot at has an 8" bullseye. Here's a closer pic:


I’m happy with the pattern.

I also put 150 rounds thru my Ruger LCP .22.
  • 50 rounds of CCI Mini Mag solids were flawless although the slide failed to lock back after the 50th shot.
  • 50 rounds of Federal 550 bulk pack had a couple failures to fire. Both rounds fired when struck on another spot on the rim. This is par for the course with that ammo in other guns.
  • 50 rounds of Federal Punch, which is a 29 grain nickel plated flat point in an extended, nickeled case. This had several failures to eject. I’m not writing this off yet because the gun was pretty dirty by the time I got to it.

I’m at the point where I’d be comfortable carrying it loaded with Mini Mag solids as long as it’s cleaned and lubed.

I also put 50 rounds of .38 full charge wadcutters through my S&W Model 15. I shot about half at the man-sized silhouette we have about 70 yards out. My hit ratio was probably around 50%, and except for 6 shots was all fired double action. I'm pretty sure that the Model 15 would be the absolute last gun I ever sell.

And here’s a doe that stood looking at me for a minute or two Friday afternoon, downrange near the silhouette.


The other major activity was a trip to Zett's Fish Farm to pick up some fish for my friend's quarter-acre pond. He bought some minnows, shiners, and large mouth bass. We're hoping that in a couple years he'll have a balanced ecosystem in the pond with not only those fish, but bluegills, catfish, and frogs (those last three are already in it).

We have our next trip planned for late October when the early antlerless deer season is open, along with small game and upland birds.

Wednesday, September 14, 2022

Fixed the Canoe Gun

My order with the replacement Siler tumbler from Track of the Wolf arrived today. It took me about a half hour after work to fit the hammer to the tumbler. I think the lock may have been assembled from a Siler kit based on the shape of the square hole in the hammer which slides over the end of the tumbler. Anyway, it now functions correctly, locking securely into the half and full cock notches.

If I get upstate this coming weekend I hope to be able to shoot it on paper to check point of impact with ball loads, and patterns with shot.

Friday, September 02, 2022

Replaced the Hand in my Rogers and Spencer Percussion Revolver

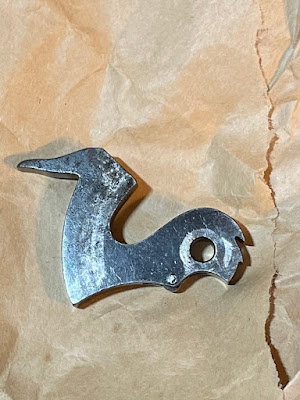
When I last shot my Euroarms of America Rogers and Spencer revolver I managed to chip the tip off the hand, rendering the gun useless. Since EOA has been out of business for several years sourcing a replacement could be challenging. The only website I found that even listed a replacement was S&S Firearms, but they were out of stock. Dixie Gun Works still has a couple R&S spare parts but no hands.


The revolver in question:


Broken hand on the left:


A friend of mine has a TIG welder. I'm going to ask him if he'd try to build up the broken hand after which I'd dress it to shape.

After I bought the gun a number of years ago, I put together a spare parts kit which included a hand. I installed it today, but first I made a detailed drawing of it in case it ever needs to be replicated. 


With a different view of the hand:


I'm sharing these for the benefit of my fellow Rogers and Spencer fans. The drawing of the hand was done by tracing around it. Quarter provided for scale.

Perhaps I was lucky but it required no fitting. The cylinder rotates and locks up nicely. I took it to the range this afternoon and put 30 - 36 shots through it. The gun worked perfectly.

As an aside, detail stripping and reassembly was made with the help of these two videos:


This is how firearms disassembly and reassembly should be done. 


Sunday, August 28, 2022

Crappy Uberti Screws Strike Again

A good part of my gun collection was made by Uberti. However, a pet peeve of mine is that the scews they use to build their guns are apparently made from cheese. For the price of these guns it's reasonable to expect that the screws will be hardened, not cross threaded, and not over-torqued, as they often are.

Today I detail stripped my 1992-vintage Uberti 1851 Navy. It was working fine but filthy inside and in need of a thorough cleaning.

One of the things I found was that the screw that holds the bolt/trigger spring in place was cross threaded at the factory. I lucked out and had an 8-32 tap so I was able to chase the threads in the frame, but I don't have an 8-32 die. (I ordered one from Amazon after discovering this.) However, the screw itself is trashed and even if I had the die I don't know if I'd be able to restore it.

So, I went to VTI Gun Parts and sent them emails to check stock on their set of properly hardened replacement screws, and also a spare hand spring while I was at it. (For whatever reason their website doesn't report live inventory.)

One of the other weaknesses of the Italian replicas is the spring for the bolt and trigger. It's flat steel and prone to breaking. I haven't broken one myself but prevention is good, so I went over to Wolff Gun Springs and ordered wire replacements for my Uberti and Pietta single actions. I'm told that Piettas use the springs for EMF Hartford guns, so I ordered 4 of those along with three Uberti replacements.

<grumble, grumble>


Quarter Inch Hand Impact Driver

If you mess with guns long enough you'll eventually run into a stuck screw. In the past I've been able to free some of these screws by soaking with Kroil, but other times I've had to drill them out using my milling machine and extract them with a screw extractor.

Another option is a hand impact driver that takes 1/4" bits commonly used in gunsmithing screwdriver sets. I bought this one from Amazon:


I've never used one of these before and it did not come with any instructions for changing which way it rotates. Naturally, it came setup to turn right, when I needed it to turn left. A minute of googling lead me to this short and informative video from Down Under:


The small driver I bought doesn't have the separate coupler shown in the video, but by clamping the narrow part in my vise I was able to change the direction of rotation.

I used the driver today to loosen the mainspring screw on my 1992-vintage Uberti 1851 Colt Navy percussion revolver, which I detail stripped for the first time. (Better late than never. Even though it was full of sludge, because it was oil soaked there was no corrosion. I don't recommend this, for the record.)

New Hammer for the Marlin 1889

In November of 2020 I bought a Marlin 1889 sporting rifle chambered for .38 WCF (AKA .38-40). The Marlin 1889 was the first side-ejecting lever action, leading to the rifles that Marlin has built ever since. When I got it I discovered that the half cock notch on the hammer was chipped. It held OK at full cock but when placed in half cock, as you'd use it when hunting, the hammer could be pushed off. This was obviously no bueno.

At the time I bought it I was unable to find a replacement. This is a hazard of collecting old guns that have been out of production for decades, or in the case of the 1889, over a century.


Actually, the full cock notch doesn't look so good, either.

At the beginning of July I did an Internet search on a lark and found that Old Arms of Idaho had a few in stock, and I decided to take a chance.


It worked out splendidly, dropping in with no fitting required.

A few days later I took the rifle to the range.


I shot the rifle with my black powder handloads in Starline brass. One oddity of guns chambered for .38 WCF is that the chamber dimensions and cartridge dimensions allow for a lot of case expansion. The British military had a similar situation with the chambers on their Lee-Enfields and .303 British ammunition. The result is that if you full length resize the brass for reloading, it work hardens the brass leading to short case life. To wit:


The good thing is that I didn't know the case split in half until after I tried to eject it and got out only half. The bad thing is that I noticed several other cases had splits and needed to be trashed.

Since I have two rifles in .38 WCF I am now sorting my cases by rifle and will adjust my sizing die to only neck size the brass. This is a hassle, especially given the current scarcity of .38 WCF brass. Unless I run across something I really want at a price I can't pass up, I won't be buying any more guns in this caliber because of the hassle.