Showing posts with label diy. Show all posts

Wednesday, October 01, 2025

Casting Sessions

Today I did some bullet casting. The temp was around 70F so I was able to do so out in my shop without sweating like a pig.


I cast up a bunch of .530" round balls for use in my .54 caliber rifles, and a few Lee 578-478M Minie balls to try in my Zouave. I'd forgotten about the Minie ball mould. I think I picked it up used last year at Dixon's.


After I culled the bad ones, I wound up with 106 of the .530 balls and 16 of the Minies.

The Minie mould is a little challenging to cast with. I think it would work better if Lee had used larger blocks to retain the heat better once it's up to temp.

The Lee round ball mould works fine, although I wish it was a 6 cavity instead of the 2 cavity mould I have. In my experience, the 6 bangers maintain temp better and you can cast a large quantity of bullets in a relatively short time.

Friday, January 12, 2024

Got a Lathe Spider

A couple weeks ago I ordered a spider for my 7x14 minilathe, something I should have bought years ago. Little Machine Shop had it as their weekly special so I finally pulled the trigger on it.

Link to minilathe spider: https://littlemachineshop.com/products/product_view.php?ProductID=1136

The spider threads onto the end of the spindle and provides additional support to long workpieces, to prevent them from whipping around.


To install the spider you remove the gear cover on the end of the headstock and simply thread it onto the end of the spindle.


I used it today while drilling and tapping the flared end of the factory ramrod that came with my Investarm Gemmer Hawken. Even though I bought an unbreakable Delrin rod for it from Track of the Wolf, which is threaded on both ends, I want to keep the OEM wood rod as a spare.

This shows the ramrod mounted through the spindle bore.


And here I was using the lathe as a tapping guide to keep the 10-32 tap straight. I did not do this under power. Instead, I used the chuck key as a handle and rotated the chuck manually. Power to the lathe was off when I did this.


Aside from drilling and tapping the end of the OEM ramrod to accept 10-32 accessories like cleaning jags, worms, and bullet pullers, both ends of both rods got drilled and cross-pinned. To drill the holes I used my minimill.

Always cross-pin your ramrod tips! Failing to do so can result in the ends pulling off the rod if you get a jag stuck or need to pull a ball. It's simple to do so:

  1. Drill a hole through the rod crossways. I used a #40 drill because for my pin I used some brass rod 0.098" in diameter.
  2. Chamfer both ends of the hole.
  3. Drive the rod through the hole and cut it off. I used side cutters.
  4. Using a hammer, peen over both ends on a metal surface. I used the anvil on my bench vise.
  5. File the ends of the pin smooth.
One end of the Delrin rod from Track is tapped 10-32 and the other is 8-32. I will use 10-32 jags, etc. and have an aluminum T-handle with an 8-32 stud on the end. I have qualms about using it for cleaning or ball pulling.

Just another example of how my small, tabletop machines help me out with gunsmithing tasks.

Sunday, July 09, 2023

Following up on the homemade percussion caps

We've been having some unpleasant weather here in SE PA recently. Hot, humid, and rainy with thunderstorms. However, yesterday I managed to sneak out for a couple hours to Boulder Valley Sportsmen's Association and shoot some targets on the woods walk course.

I took the Slotter-style plains rifle (which has become my favorite rifle) and aside from a capper full of CCI No.11s, a also brought along 6 of the homemade percussion caps from last month, in a 3D-printed star capper.

When shooting a caplock rifle it's always good to make sure the flash channel is clear before loading. This is most commonly done by popping a cap while holding the muzzle near a blade of grass or a leaf. If it moves you know the channel is clear.

Note that if I'm loading the rifle prior to a hunt, rather that popping a cap I'll use some rubbing alcohol and compressed air to ensure the channel is clear, especially since I may be loading (but not priming) the rifle at home. This is not a bad idea nowadays anyway, since No. 11 caps are hard to buy.

I did that with one of the homemade caps and it moved a blade of grass. However, when I loaded the rifle I found that the homebrew caps would not ignite the main charge unless I primed the nipple with 4Fg black powder first. That slowed the lock time down so that it was comparable with a flintlock.

(I keep a nipple primer in my shooting pouch in case I encounter ignition problems. This was the first time I actually needed it.)

Having tried them and found them wanting for use in sidelock rifles, I plan to make up another batch but add more priming compound.

Sunday, May 07, 2023

Made a Couple of Brass Drifts

This afternoon I went out to the shop and made a couple drifts from some square brass stock, for use with Colt-style percussion revolvers and also rifles on which the barrel is held on with a key or keys.


Naturally, I could have made these with a file but a milling machine, even a small one like my Grizzly G8689 makes it a lot easier. Don't ever let anyone tell you the table top machines are useless.


Pietta 1860 Army Sheriff Range Report, and Two Useful Accessories

Last night I took a new Pietta 1860 Army Sheriff's Model percussion revolver to the range. Overall, I am quite pleased with the gun. Timing and lockup are tight, wood-to-metal fit is excellent, and overall it's a fine looking and shooting piece.

The session was not without it's difficulties, however. A couple years ago I'd made up 50 paper cartridges loaded with a Hornady .454 ball on top of 25 grains of 3Fg Hodgdon Triple 7 black powder substitute, and had half of them left. The T7 came from a bottle that I bought several years ago. I've read that once you break the seal it begins to deteriorate, but up until now I haven't noticed any problems with it.

I loaded the first cylinder with the paper cartridges and I could only get two to go off, even with recapping. So, I pulled the cylinder out, removed the cones on the unfired chambers, and put about three grains of black powder in each using the flintlock pan primer I keep in my BP revolver shooting box in case I dry ball.

Previously, none of the paper cartridges I've made have had ignition problems, no matter if they were loaded with Triple 7 or black powder.

After reassembling the gun and recapping the chambers, all of them went off.

I have 19 of those cartridges left along with a flask full of the remaining Triple 7. The next time I shoot the gun I'll try them with a black powder initiator charge in the bottom of the chambers. I hate to waste powder.

After I switched over to loose ball and Scheutzen 3Fg black powder and a felt wad lubed with pure neatsfoot oil, the gun gave me no more issues. I fired 5 or 6 cylinders full, with all my shots going into one hole at 7 yards. Elevation was dead on but I was shooting a little to the right, which was probably me pushing the trigger a little.

The cylinder arbor was lubed with Lucas white lithium grease. I've found this to be an excellent lubricant for that purpose. After 30 to 36 shots the cylinder was still turning freely.

The other accessory worth mentioning was a slip-on handle for the loading lever that I made from a short section of PVC pipe a little longer than the lever. The short levers on the "sherriff's model" percussion revolvers make seating the required oversized ball somewhat difficult. The short section of PVC made it a lot easier.


Like my 1851 Navy Sheriff, the 1860 Army Sheriff is a fantasy gun. Colt never made such a piece although it's possible that guns could have been so modified by users or gunsmiths. Porter Rockwell, the Mormon Avenger was known to carry a Colt cut down to snubbie length with the loading lever removed and a new front sight fitted.

Regardless of whether short percussion revolvers are historically correct, they are fun to shoot and easier to carry afield than their full length cousins.

Sunday, April 30, 2023

Installing a New Front Sight on a Pietta 1851 Navy

Several years ago I bought a Pietta 1851 Navy Sheriff's Model .44 caliber percussion revolver. It's strictly a fantasy gun in that Colt never made an 1851 Navy with this short a barrel, nor did they make them in .44. All real Colt Navy revolvers are .36s, with the exception of a very few experimental .40 caliber guns. Regardless, it's a fun little gun but severely handicapped by the factory front sight, which is a miniscule brass cone that's both hard to see and too short, resulting in the gun shooting very high at pistol ranges.

So today, I fixed that by cutting a dovetail in the barrel and installing a taller blade front sight that I'll be able to actually see and also can file to zero the piece.

Here's what the factory front sight looked like, along with the rifle front sight I modified to use:


I have a Grizzly G8689 mini mill. I first used it with a 1/8" end mill to cut the old sight flush with the barrel. Then I cut a slot a bit less than the width of the top of the front sight base. I cut the slot 0.07" deep to match the thickness of the front sight. (The mill has digital readouts fitted to allow me to make precise cuts.)


Then I used a 3/8" dovetail end mill to turn it into a dovetail. You can see the factory hole for the original front sight in the dovetail.


Using a couple files and trial and error, I fit the new sight to the barrel.


I left it extra tall so that I can use a file to raise the point of impact to the point of aim. I'll probably zero it with a load of a .454 ball on top of 30 grains of 3Fg black powder. After it's zeroed I will shape the front of the blade and cold blue it.

Aside from the front sight I plan to slightly enlarge the rear sight notch in the hammer nose, and replace the factory nipples with Tresos that have small flash holes for less blow back and cap fragmenting. An accessory I plan to make is an extension to slip over the loading rod for better leverage. That's not needed on the full length guns but this will benefit from that. Those without machine tools can purchase one from Slix Shot.


Saturday, April 15, 2023

Ball Starter Holders on Shooting Pouch Straps

When loading and shooting a muzzleloader from a shooting pouch, the less stuff in the pouch the better. The more stuff that's in the bag, the more you have to rummage through when reloading. Many shooters who use a ball or short starter store it on the bag strap when not in use.

The shooting pouch I have from The Leatherman came with such a holder sewn to the jute strap. However, as a lefty, it's on the wrong side of the strap because I have the bag slung across my right shoulder, hanging on my left hip. The October Country bag I've been using with my halfstock percussion rifle didn't have anything on the strap. I fixed up both bags today.

This is the short starter holder that came on the Leatherman bag:


And here are the holders I added to both bags today:


They are simply pieces of 1-1/4" wide leather strap folder over and held in place with Chicago screws. Rivets would work just as well. On the Leatherman bag, I used one of the existing holes in the strap while I punched a hole in the October Country bag strab. A drop of blue thread locker on each Chicago screw ensures that they will stay together.

The leather I used is fairly thick and rigid, so the holders stay open when the starter is removed, and they don't flop around when inserted. I made them snug enough so that I don't need to worry about losing the starter but it's still easy to remove.

Thursday, April 06, 2023

Made a new short starter today

I have been wanting to try a short starter that has a flat head, which should carry better in my shooting pouch than those with a ball head. So, today I made one today from oak, a hardwood dowel, brass tubing, and brass rod. I used Fiebing’s medium brown leather dye for stain and finished it with Watco Danish oil. Tomorrow I’ll rub in some Sno-Seal.


All joints are glued and pinned, so it's not coming apart anytime soon.

Saturday, April 01, 2023

Enhancing my ramrod and short starter

The Delrin ramrod I put together for my California half stock rifle only had one threaded end on it. If I'm ever out in the field with the rifle and need to pull a ball that would be a problem, so today I added a tapered steel ferrule to the other end. It's threaded 8-32 to accept accessories, including this T-handle I have.


The T-handle also provides a better grip if I'm cleaning, the patch is too tight, and it gets stuck down at the breech.

While I was at it I also drilled a 5/16" hole about 1/2" deep in my short starter, so I can use it as a palm saver if it gets difficult to fully seat a ball due to fouling.


When adding a ferrule to the end of a ramrod it's very important to not only have a tight fit, but to glue and pin it in place. Otherwise, the odds are good that at some point it will come off, especially if you have a stubborn patch or are trying to pull a ball. I cross drill a hole through both the tip and rod after glueing the ferrule on, chamfer the ends of the hole, put a little glue in the hole, and drive the pin through. Then I cut it a little long and peen over both ends, and finally, file or sand it smooth.

Saturday, October 15, 2022

Made an aluminum field rod for my Cabela's Hawken

I wanted a ramrod that was a bit longer than my Cabela's Hawken's 29" barrel, and one I won't have to worry about breaking in the field. I rummaged around in my shop and found a piece of aluminum rod that was 36" long x 3/8" diameter, the same as the factory wood rod.

I put the rod in the bore and then marked it a few inches about the muzzle then cut it off with a hacksaw. Then I used my lathe to face the ends, then drill and tap each end to accept 10-32 threaded accessories like cleaning jags, worms, and ball screws. Finally, I sanded it with some 220 grit sandpaper so that it's smooth but not too shiny.

The aluminum rod is slightly heavier than the wood rod but not nearly as much as a brass rod would be.

Testing my threading job with a .58 caliber jag that was on my workbench:


With a long .50 caliber jag on the end it sticks out several inches, to give me a decent grip:


And finally, stowed in place under the rifle. I'll keep the jag in my shooting pouch when in the field.


By drilling and tapping both ends I can affix an extension or T-handle to one and a jag or ball puller to the other.

The primary use for this rod will be when hunting. I use a thinner, stainless steel range rod with a muzzle guide when practicing. I might use it if I even shoot on a woods walk.

This is another example of why it's handy to have a small lathe and some drills and taps if you're a shooter.

Friday, October 07, 2022

Black and Decker Workmate 225 Craigslist Score

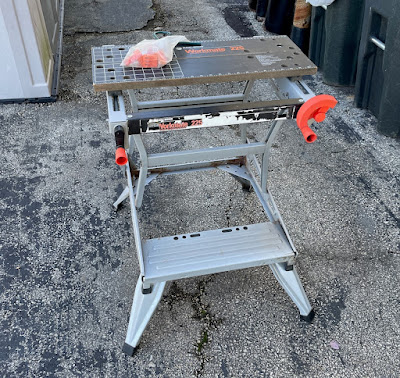
This morning I picked up this slightly used Black and Decker Workmate 225 that I found on Craigslist, from a seller about 10 minutes away, and it only cost me $15. I just had to clean off some dirt and cobwebs, and then I lubed all the pivots with Pedro's Ice Wax dry film bike chain lube. I used that because once it dries it doesn't leave behind an oily film that will collect dust.


I'm going to make another gun holder insert and take this one up to my friend's off-grid cabin. He's got a vise we can leave up there as well, and we're also going to make a set of sawbucks to use with it.

Compared with the cheap Harbor Freight portable folding workbench that I already had, this is a lot more robust.

This unit is older but Black & Decker still makes it. If you cannot find a used one they are available at home centers or on Amazon.

Wednesday, October 05, 2022

A Portable Shooting Table for Muzzleloaders

Now that my canoe gun is back in one piece I want to prevent a recurrence of having the gun fall over and breaking something.

I have this portable foldable workbench that I bought years ago from Harbor Freight. The current price is $19.99 but I paid only $5 for it. It's a cheap knock-off of a Black and Decker WorkMate. Inspired by this thread on Bushcraft USA, I threw together an insert that I can use to turn it into a portable loading and cleaning table for my muzzleloaders.


I used scrap lumber I had laying around along with a few drywall screws and some Titebond II wood glue.

The center piece is a length of 1x3 that's been laying under my shed, hence the weathered appearance. The end on the right is made from some 1x4, doubled on the "wings" to help prevent splitting. I know my cuts look like crap. I should have used a saw with a finer blade to prevent splintering.

The notches on the right side and the other end give me plenty of options for holding guns and range rods, and I can put a range box on top.

Saturday, September 24, 2022

Made a Short Starter and a Leather Capper

 I was feeling crafty so I made these today. The antler is from a buck I shot last year. The other parts are a length of 3/8" poplar dowel, a short length of 3/8" brass rod, and a .38 Special case with the end turned down. All parts are glued and pinned together with brass pins I cut from brass rod.

The capper was made from a piece of scrap leather. The top right hole is to tie it to my shooting bag. The row of holes all have a slit going to the edge of the leather. It's sized for #11 caps.


Wednesday, September 14, 2022

Fixed the Canoe Gun

My order with the replacement Siler tumbler from Track of the Wolf arrived today. It took me about a half hour after work to fit the hammer to the tumbler. I think the lock may have been assembled from a Siler kit based on the shape of the square hole in the hammer which slides over the end of the tumbler. Anyway, it now functions correctly, locking securely into the half and full cock notches.

If I get upstate this coming weekend I hope to be able to shoot it on paper to check point of impact with ball loads, and patterns with shot.

Saturday, September 10, 2022

Powder Horn

I've had this powder horn for several years. If I remember correctly it was an economy horn from October Country. Whatever color you get with these is the luck of the draw, and as it came it was mostly white with some black.

The horn had a simple staple on the wood plug. I replaced that with the brass acorn that screws into a ferrule I drilled. This it to make filling the horn easier.

One of the things they teach you in hunter safety education is to try and avoid wearing anything white during hunting season because it can look like a deer's white tail and sometimes you are around idiots who will shoot at anything that moves. This probably isn't nearly as much of an issue now that hunter ed classes have been required, along with blaze orange, for decades, but a mostly white horn never sat right with me.

So last night I went over the horn with Fiebing's medium brown leather dye and let it sit overnight. This morning it was still tacky when I went over it with 0000 steel wool. This removed most of the dye sitting on the surface that hadn't been absorbed. I wiped it down vigorously with a paper shop towel, then applied some Sno Seal and buffed that out with the shop towel.


I'm happy with the new look. Right now it has just a thin leather thong to carry it. I need to buy or make a better strap for it.

Thursday, September 08, 2022

More Test Loads for the Canoe Gun

Over my lunch break I put together some ball rounds for the Jackie Brown canoe gun. Again, I used Post-Its for the paper along with a glue stick. These include a .575 round ball and 65 grains of 3Fg Schuetzen black powder.


After the glue dries a bit more I'm going to smear a little lube around the ball end. These are pretty snug in the bore so the lube will help reloading. Were I planning on extensive shooting without wiping the bore I'd need to go to a smaller ball. I have some .570s for this purpose, or even .562s.

Note that these are not combustible cartridges as you'd use in a percussion revolver. Rather, these are designed to have the end opened or torn off, the powder dumped down the bore, and then the ball and paper rammed down on top. The paper acts as a patch and wadding between powder and ball. The paper will be blown out of the barrel, not burned inside it.

The ammo I made up today could also be used in my Indian-made Tulle Fusil de Chasse, which is a 20 gauge flintlock shotgun.

Monday, September 05, 2022

A Sling for the Canoe Gun

Since the canoe gun came setup for a sling I made one last night.

I cut a length of cowhide ~1.25" wide by ~48" long. One the butt end I punched a hole and then made a slit so it fits over the sling mounting button. On the muzzle end I punched a series of holes for a leather thong to go through.

The leather was a light natural tan color, so I used some Fiebing's dark brown leather dye to darken it. After that dried I worked some neatsfoot oil into both sides of the leather to moisturize and soften it. The leather drank it up. Finally, I gave both sides a coat of Montana Pitch Blend dressing. This is a mix of pine pitch, mink oil, and beeswax. I also worked the leather back and forth to soften it a little since it was very stiff.

I'll probably punch a few more holes in it so I can let it out to go over a heavy coat.

It came out pretty nicely, if I do say so myself.


Friday, September 02, 2022

Replaced the Hand in my Rogers and Spencer Percussion Revolver

When I last shot my Euroarms of America Rogers and Spencer revolver I managed to chip the tip off the hand, rendering the gun useless. Since EOA has been out of business for several years sourcing a replacement could be challenging. The only website I found that even listed a replacement was S&S Firearms, but they were out of stock. Dixie Gun Works still has a couple R&S spare parts but no hands.


The revolver in question:


Broken hand on the left:


A friend of mine has a TIG welder. I'm going to ask him if he'd try to build up the broken hand after which I'd dress it to shape.

After I bought the gun a number of years ago, I put together a spare parts kit which included a hand. I installed it today, but first I made a detailed drawing of it in case it ever needs to be replicated. 


With a different view of the hand:


I'm sharing these for the benefit of my fellow Rogers and Spencer fans. The drawing of the hand was done by tracing around it. Quarter provided for scale.

Perhaps I was lucky but it required no fitting. The cylinder rotates and locks up nicely. I took it to the range this afternoon and put 30 - 36 shots through it. The gun worked perfectly.

As an aside, detail stripping and reassembly was made with the help of these two videos:


This is how firearms disassembly and reassembly should be done. 


Sunday, August 28, 2022

Crappy Uberti Screws Strike Again

A good part of my gun collection was made by Uberti. However, a pet peeve of mine is that the scews they use to build their guns are apparently made from cheese. For the price of these guns it's reasonable to expect that the screws will be hardened, not cross threaded, and not over-torqued, as they often are.

Today I detail stripped my 1992-vintage Uberti 1851 Navy. It was working fine but filthy inside and in need of a thorough cleaning.

One of the things I found was that the screw that holds the bolt/trigger spring in place was cross threaded at the factory. I lucked out and had an 8-32 tap so I was able to chase the threads in the frame, but I don't have an 8-32 die. (I ordered one from Amazon after discovering this.) However, the screw itself is trashed and even if I had the die I don't know if I'd be able to restore it.

So, I went to VTI Gun Parts and sent them emails to check stock on their set of properly hardened replacement screws, and also a spare hand spring while I was at it. (For whatever reason their website doesn't report live inventory.)

One of the other weaknesses of the Italian replicas is the spring for the bolt and trigger. It's flat steel and prone to breaking. I haven't broken one myself but prevention is good, so I went over to Wolff Gun Springs and ordered wire replacements for my Uberti and Pietta single actions. I'm told that Piettas use the springs for EMF Hartford guns, so I ordered 4 of those along with three Uberti replacements.

<grumble, grumble>


Quarter Inch Hand Impact Driver

If you mess with guns long enough you'll eventually run into a stuck screw. In the past I've been able to free some of these screws by soaking with Kroil, but other times I've had to drill them out using my milling machine and extract them with a screw extractor.

Another option is a hand impact driver that takes 1/4" bits commonly used in gunsmithing screwdriver sets. I bought this one from Amazon:


I've never used one of these before and it did not come with any instructions for changing which way it rotates. Naturally, it came setup to turn right, when I needed it to turn left. A minute of googling lead me to this short and informative video from Down Under:


The small driver I bought doesn't have the separate coupler shown in the video, but by clamping the narrow part in my vise I was able to change the direction of rotation.

I used the driver today to loosen the mainspring screw on my 1992-vintage Uberti 1851 Colt Navy percussion revolver, which I detail stripped for the first time. (Better late than never. Even though it was full of sludge, because it was oil soaked there was no corrosion. I don't recommend this, for the record.)