I was out of .44 wads for my percussion revolvers so I made up a tobacco tin full of them. This should do for a few plinking sessions.
The wads themselves are punched out of 1/8” thick hard 100% wool felt from Durofelt. I use a 7/16” hole punch held in the chuck of my mill/drill and use a piece of scrap wood underneath.
Instead of my previous homemade lube of a mix of beeswax and mutton tallow, I lubed this batch with neatsfoot oil. It worked great when I tried it as a patch lube so I don’t see why it wouldn’t work to keep the fouling soft in revolvers. If I intended to leave the gun loaded for awhile I’d want more of a grease than oil, to prevent ruining the powder charge, but this will be fine for the range.
To lube them, I put some neatsfoot oil in an empty Scho-Ka-Kola chocolate tin then soaked a batch at a time. I squeezed out the excess and then put them on a paper towel to soak up some more oil, so they aren’t sopping wet.
Assuming they work as well as the beeswax/mutton tallow lubed wads for target shooting, this is probably how I’ll make up them up in the future. It’s easier than making the lube mix and I don’t have to dig out the hot plate I use to melt the other lube.
Friday, April 05, 2019
Saturday, March 30, 2019
Relaxation
I spent some time relaxing out in my shop today.
I couldn't find the bag with my pipe paraphernalia, so a .308 empty served as a tamper.
Brown Bess Flash Guard Removal
Today I removed the flash guard that came on my Pedersoli Brown Bess Carbine's lock. Flash guards are used on flintlocks by reenactors to protect the man to their right when firing in formation. As I am not a reenactor, it's unneeded. Further, it makes the lock harder to clean and directs a lot of fouling down alongside the side of the gun.
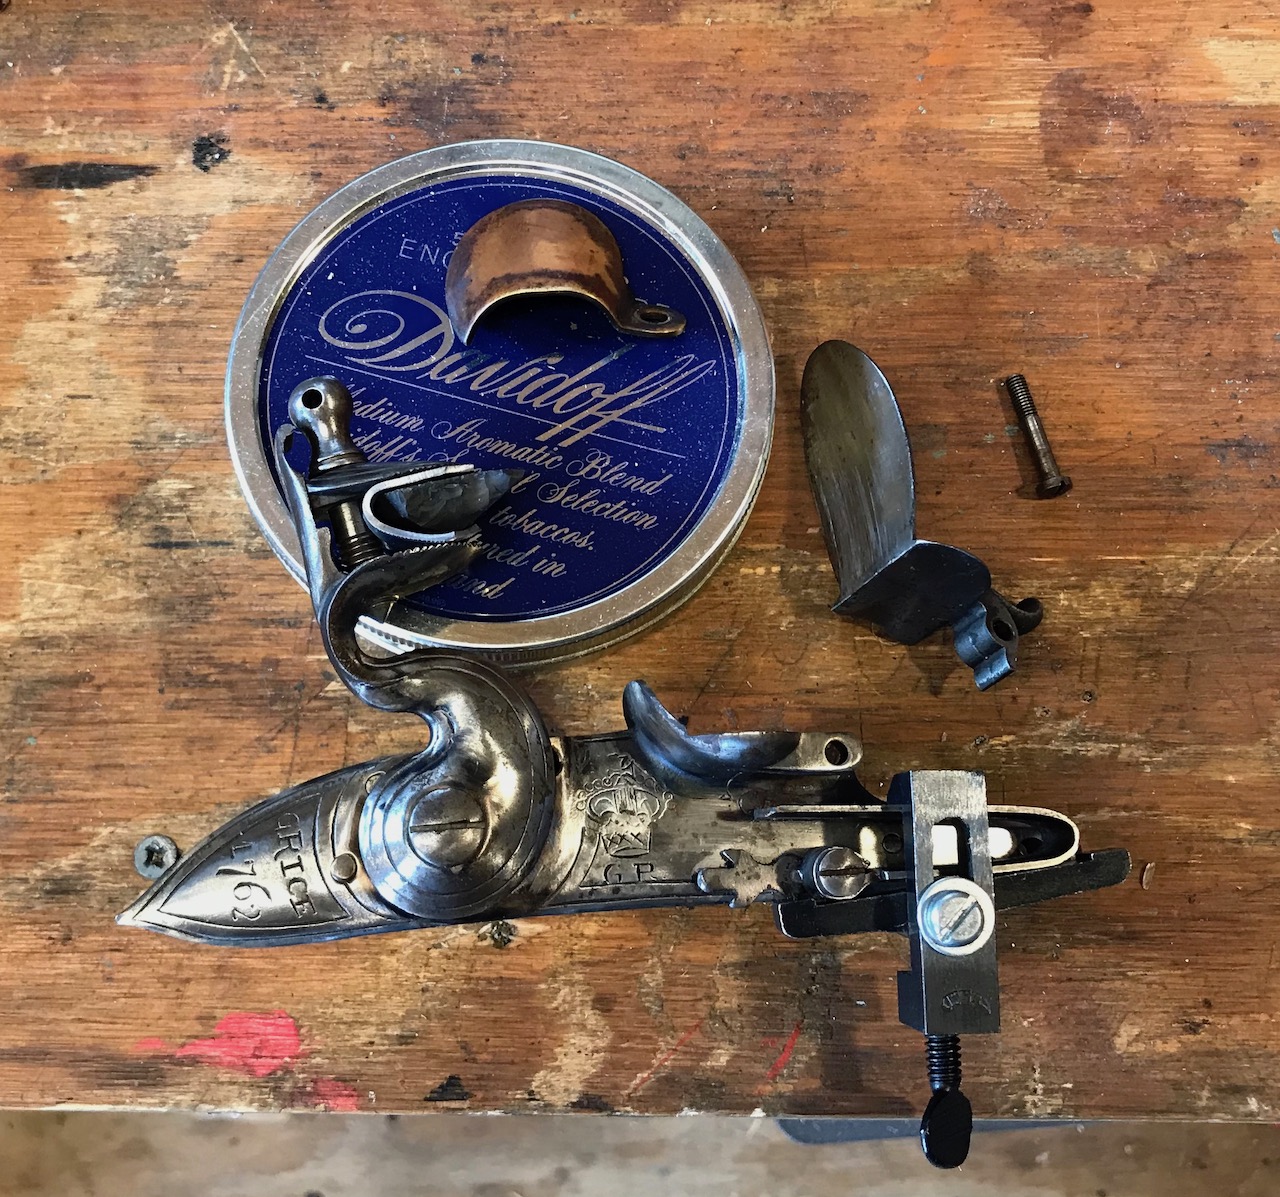
Because the frizzen is spring loaded no matter which position it's in, I needed to compress the frizzen spring to facilitate removal. In the picture you can see how I used my RMC mainspring vise for this. I bought it from Track of the Wolf and it's come in handy working on several flintlocks that I own.
You may also notice that I now have the flint wrapped in a piece of 1/16" sheet lead, rather than leather. The flint kept loosening when I shot the gun last weekend. This allows me to really clamp down on it and I'm hoping this will fix that problem. Using lead instead of leather for this was common on military flintlocks of the 18th and 19th Centuries. I bought the lead sheet from Rotometals, via Amazon Prime. I figure the foot square sheet of lead will last me the rest of my life, and I can always melt it down for bullets.
Note: I really should have removed the flint from the hammer before doing any work on the lock. Had it tripped, it could have caused a really nasty wound. Do as I say, not as I do.
Because the frizzen is spring loaded no matter which position it's in, I needed to compress the frizzen spring to facilitate removal. In the picture you can see how I used my RMC mainspring vise for this. I bought it from Track of the Wolf and it's come in handy working on several flintlocks that I own.
You may also notice that I now have the flint wrapped in a piece of 1/16" sheet lead, rather than leather. The flint kept loosening when I shot the gun last weekend. This allows me to really clamp down on it and I'm hoping this will fix that problem. Using lead instead of leather for this was common on military flintlocks of the 18th and 19th Centuries. I bought the lead sheet from Rotometals, via Amazon Prime. I figure the foot square sheet of lead will last me the rest of my life, and I can always melt it down for bullets.
Note: I really should have removed the flint from the hammer before doing any work on the lock. Had it tripped, it could have caused a really nasty wound. Do as I say, not as I do.
Sunday, March 24, 2019
Pedersoli Brown Bess Carbine Range Report
So I shot the Bess carbine today.
My first shot was a patched 0.735 ball. That’s a VERY tight fit so if I shoot any more of them, I’ll try them bare. Some smoothbore shooters do well with an over-power card or wad, bare ball, and an over ball card to hold it in place. I also have some 0.710 balls which should be easier to load with a patch, but I didn’t bring them today.
I put around 15 rounds of the paper cartridges with .690 balls through the gun. The last loaded nearly as easy as the first. I noticed that after about 10 shots there was a crud ring forming in the breech so it required extra pressure to fully seat the ball. I really liked loading from paper cartridges. I’m going to make up some for my fusil de chasse.
Compared with my longrifle, it has a much slower lock time, so follow through is even more important for good shooting.
I had a number of misfires due to lack of spark. I think what was happening was that the top jaw screw would loosen, because when I tightened it back up the gun would alway off. Obviously I need to fix that.
Recoil was noticeable but not bad.
Video:
My first shot was a patched 0.735 ball. That’s a VERY tight fit so if I shoot any more of them, I’ll try them bare. Some smoothbore shooters do well with an over-power card or wad, bare ball, and an over ball card to hold it in place. I also have some 0.710 balls which should be easier to load with a patch, but I didn’t bring them today.
I put around 15 rounds of the paper cartridges with .690 balls through the gun. The last loaded nearly as easy as the first. I noticed that after about 10 shots there was a crud ring forming in the breech so it required extra pressure to fully seat the ball. I really liked loading from paper cartridges. I’m going to make up some for my fusil de chasse.
Compared with my longrifle, it has a much slower lock time, so follow through is even more important for good shooting.
I had a number of misfires due to lack of spark. I think what was happening was that the top jaw screw would loosen, because when I tightened it back up the gun would alway off. Obviously I need to fix that.
Recoil was noticeable but not bad.
Video:
Labels:
black powder guns shooting,
Brown Bess,
guns,
guns shooting,
Pedersoli
Saturday, March 23, 2019
Made Up Some Musket Cartridges Today
I'll be shooting my Pedersoli Brown Bess carbine for the first time tomorrow so I made up some ammunition today.
The paper cartridges are rolled around a form to create a tube holding the ball and powder charge. Most people use a dowel for this but I have a metal lathe, so I made the form from a piece of 3/4" aluminum rod turned down to .69”. (Besides, it's been too long since I made some chips.)
I put a cavity on the end to help keep the ball in place when I’m rolling the cartridges.
Recipe:
Rather than tying the end I use a glue stick on the diagonal edge and ball end. As I understand it, French musket cartridges were made with glue while British rounds were tied.
I used this template, which I found after watching this excellent video by Tim Brieaddy:
Starting to roll the cartridge. At this point, I've gone over the diagonal edge with the glue stick.
Rolled almost all the way.
Forming the end.
Twenty five rolled cartridges, ready to fill.
Crimping the end and creating the tail that will be bit off prior to loading the musket.
And finally, a box of 25 ball cartridges.
I'll be going to a friend's place tomorrow to try them. I'm also bringing some loose .735" balls, powder, and patches to try patched round ball loads.
Range report to follow.
The paper cartridges are rolled around a form to create a tube holding the ball and powder charge. Most people use a dowel for this but I have a metal lathe, so I made the form from a piece of 3/4" aluminum rod turned down to .69”. (Besides, it's been too long since I made some chips.)
I put a cavity on the end to help keep the ball in place when I’m rolling the cartridges.
Recipe:
- .690 ball by Rush Creek.
- 100 grains 2Fg Goex black powder. The original British service load was up to 165 grains of 1Fg powder, some of which was used for priming. I’ll prime from a flask. By most accounts, you get better accuracy from a smoothbore with stout loads.
- I used printer paper since it's what I had on hand.
Rather than tying the end I use a glue stick on the diagonal edge and ball end. As I understand it, French musket cartridges were made with glue while British rounds were tied.
I used this template, which I found after watching this excellent video by Tim Brieaddy:
Starting to roll the cartridge. At this point, I've gone over the diagonal edge with the glue stick.
Rolled almost all the way.
Forming the end.
Twenty five rolled cartridges, ready to fill.
Crimping the end and creating the tail that will be bit off prior to loading the musket.
And finally, a box of 25 ball cartridges.
I'll be going to a friend's place tomorrow to try them. I'm also bringing some loose .735" balls, powder, and patches to try patched round ball loads.
Range report to follow.
Saturday, March 16, 2019
Pedersoli Brown Bess Carbine
I could probably use an intervention. :) I went up to Dixon’s today and he had a used Pedersoli Brown Bess carbine on the rack at a price too good to pass up — $750. By contrast, Dixie Gun Works catalogs this gun at $1495.
The barrel had some rust along the wood line and a little under the stock in the groove around the breech. It looked like water had run down at one time and not properly dried before rust set in. It cleaned off with a bit of WD40, steel wool, and elbow grease. The lock is in fine shape and sparks well.
The sling swivels were added by the previous owner. Unfortunately, the upper swivel is just attached to the wood and if it drops can foul the ramrod. I may relocate it further toward the muzzle so that it falls on the upper ramrod pipe, and add a lug to the barrel so that it isn’t just held to the stock.
This isn't a replica of any original gun. Although the British did issue carbines in the 18th Century, this is basically a factory-chopped Second Pattern Brown Bess. Original Artillery carbines, for example, had a 39" barrel and were of .65 caliber rather than .75 as this is.
It should be an excellent shooter.
The barrel had some rust along the wood line and a little under the stock in the groove around the breech. It looked like water had run down at one time and not properly dried before rust set in. It cleaned off with a bit of WD40, steel wool, and elbow grease. The lock is in fine shape and sparks well.
The sling swivels were added by the previous owner. Unfortunately, the upper swivel is just attached to the wood and if it drops can foul the ramrod. I may relocate it further toward the muzzle so that it falls on the upper ramrod pipe, and add a lug to the barrel so that it isn’t just held to the stock.
This isn't a replica of any original gun. Although the British did issue carbines in the 18th Century, this is basically a factory-chopped Second Pattern Brown Bess. Original Artillery carbines, for example, had a 39" barrel and were of .65 caliber rather than .75 as this is.
It should be an excellent shooter.
Labels:
black powder guns shooting,
Brown Bess,
flintlocks,
Pedersoli
Sunday, February 24, 2019
Post-Cleaning Borescope of the Brown Bess
I ran out to Lowe's yesterday and bought a 5 foot section of 2" PVC pipe, and a couple caps. After degreasing the barrel, I soaked it overnight in Evaporust inside the pipe. After a little scrubbing this morning, this is what the inside looks like:
It's looking a lot better.
Labels:
black powder guns shooting,
Brown Bess,
guns,
gunsmithing,
IMA-USA
Saturday, February 23, 2019
More Work on the Brown Bess
I've been doing some restoration work on the Brown Bess over the past few days.
I determined the reason that it's not going into full cock is that the sear spring is not applying pressure to the sear after it rotates a certain amount. Either the V of the spring isn't wide enough, the lower leg of the spring isn't long enough, or the sear is bent. I need to figure out how I'm going to fix it.
Today I removed the barrel to check for pitting under the wood line. It's not too bad.
This is the breech end. Note the Nepalese marking.
This is the worst of the pitting:
It's not very deep.
The barrel is currently soaking in Evaporust. After I get it out and get it wiped down, I'll borescope it again to see what the inside looks like.
I determined the reason that it's not going into full cock is that the sear spring is not applying pressure to the sear after it rotates a certain amount. Either the V of the spring isn't wide enough, the lower leg of the spring isn't long enough, or the sear is bent. I need to figure out how I'm going to fix it.
Today I removed the barrel to check for pitting under the wood line. It's not too bad.
This is the breech end. Note the Nepalese marking.
This is the worst of the pitting:
It's not very deep.
The barrel is currently soaking in Evaporust. After I get it out and get it wiped down, I'll borescope it again to see what the inside looks like.
Labels:
black powder guns shooting,
Brown Bess,
guns,
gunsmithing,
IMA-USA
Tuesday, February 19, 2019
Worked Some More on the Brown Bess
After letting the bore soak overnight I did some scrubbing today with a 12 gauge bore brush (which is undersized for the bore) and even wrapped some steel wool into the bristles. It's coming along and looks promising.
All the nasty brown scale shown in my video from yesterday is gone. The bore is rough but there do not seem to be any really deep pits. I've got it soaking in Kroil again for now. I figure that I'll wipe that out and use Evaporust.
Labels:
black powder guns shooting,
Brown Bess,
gunsmithing,
IMA-USA
Monday, February 18, 2019
Bore Scoped the Brown Bess
I ran my cheap USB endoscope that I got from Amazon down the bore and captured the video using Photobooth on my MacBook Pro.
It's downright crusty. The fuzzy bits are from cleaning patches.
This was after a couple oily patches and spraying some WD-40 down the tube. I almost got the rod stuck on the way out but managed to extract it. I now have the bore soaking in Kroil, pending the use of a brush and/or Evaporust.
It's downright crusty. The fuzzy bits are from cleaning patches.
This was after a couple oily patches and spraying some WD-40 down the tube. I almost got the rod stuck on the way out but managed to extract it. I now have the bore soaking in Kroil, pending the use of a brush and/or Evaporust.
Labels:
black powder guns shooting,
borescope,
Brown Bess
East India Pattern Brown Bess from the Nepalese Cache
Meet my latest acquisition, an East India Pattern Brown Bess musket from the Nepalese Cache. I ordered it last week from International Military Antiques, and it arrived today. Click the pictures for a larger version.
The stock is newly made.
This one has a Gurkha-marked lock.
Inside of the lock:
The ramrod pipes, nosecap, and bayonet lug/front sight:
The sideplate:
I also got a combination tool to go with the musket:
Overall it seems to be in pretty decent shape for a military gun that is nearly 200 years old. The lock does need a little work. It will hold on half cock but the sear doesn't want to move and engage the sear on full cock. It may just be a bit gummy or the sear spring may need work.
The part of the barrel visible above the line of the wood is not overly pitted. I plan to dismount it from the stock to check its condition there. The bore is rusty. I ran some patches soaked in WD-40 down the barrel but I'm planning to soak it in Evaporust.
Once I get the lock to hold full cock I'll be able to test for spark. The frizzen looks to be in good shape. After I confirm spark, I plan to remotely test fire it using some cannon fuse.
More posts to come.
The stock is newly made.
This one has a Gurkha-marked lock.
Inside of the lock:
The ramrod pipes, nosecap, and bayonet lug/front sight:
The sideplate:
I also got a combination tool to go with the musket:
Overall it seems to be in pretty decent shape for a military gun that is nearly 200 years old. The lock does need a little work. It will hold on half cock but the sear doesn't want to move and engage the sear on full cock. It may just be a bit gummy or the sear spring may need work.
The part of the barrel visible above the line of the wood is not overly pitted. I plan to dismount it from the stock to check its condition there. The bore is rusty. I ran some patches soaked in WD-40 down the barrel but I'm planning to soak it in Evaporust.
Once I get the lock to hold full cock I'll be able to test for spark. The frizzen looks to be in good shape. After I confirm spark, I plan to remotely test fire it using some cannon fuse.
More posts to come.
Labels:
black powder guns shooting,
Brown Bess,
IMA-USA
Saturday, February 09, 2019
The Original Real Man's Coffee Cup
It is a USGI canteen cup made by Ingersoll Products sometime in the early 1970s. I got in around 1985 after I joined Civil Air Patrol. The outside is black from heating many meals in campfires.
American servicemen have been using canteen cups since the introduction of the M-1910 over a century ago. It's one of the best pieces of gear ever. The main thing it really needs is some kind of a lid. I have an older Heavy Cover brand stainless steel lid that I modified a bit to make it lighter, but for a couple decades I just relied on a piece of aluminum foil.
Newer USGI canteen cups have folding butterfly-style wire handles. I prefer the older L-style cups like this one. It's one feature of the Keith Titanium set that I would change. (OTH, the Keith sets come with a nice lid for the cup, so there's that.)
The horizontal slot in the handle is to allow you to put a fork from the M-1926 fork into it as an extension for when you're cooking on a fire. The vertical slot is to allow it to be slipped over the handle of the mess kit (AKA "meat can") so the whole ensemble can be dunked in boiling water for field sterilization.
Survival Resources has a nice article on useful mods to this style cup, including how to make a lid, adding D-rings to the handle so you can use a stick for an extension, and adding a bail. Check it out. (Incidentally, I recently ordered a few things from Survival Resources including a haversack. I plan to do a post and/or video on that as soon as I can get to it. No problems at all with my order and I got it quickly.)
Labels:
bushcraft,
camping,
canteen cup,
emergency preparation,
survival preps
Monday, January 28, 2019
Townsends: Fire Starting No Matches No Lighter
This is a very good video on fire starting with flint and steel, including the use of a flintlock, from Jas. Townsend's & Son's YouTube channel:
Aside from a flint and steel, they demonstrate how you can do it with a flintlock gun.
Labels:
bushcraft,
fire,
flint and steel,
flintlocks,
survival,
survival preps
Sunday, January 27, 2019
Hopkins and Allen Underhammer Caplock Rifle
One of my oldest memories is associated with this rifle.
The year was 1970 and I was two years old. We were visiting my paternal grandparents in Patchogue, New Yawk. My dad went to a local gun shop and came back with this Hopkins & Allen .45 caliber Heritage Model underhammer caplock percussion rifle.
The black powder revival of the 1960s and 70s was in full swing, and Numrich Arms of West Hurley, NY, owned the rights to use the old Hopkins & Allen name. They started making these simple designs with only two moving parts, the hammer and trigger. The trigger guard is a flat spring and acts as the hammer spring.
In 1981 my parents gave me the rifle as my bar mitzvah gift. (I am quite aware of how unusual that sentence reads.)
I loaded the rifle with 40 grains of 3Fg black powder and a .440" round ball patched with ticking. It is quite accurate out to 50 yards and I used it to win the first shooting match I ever entered.
Because the nipple screws directly into the barrel where the powder charge sits, ignition is very reliable and fast. There can be some spitting, though, so it's wise to hold your support arm off to the side and wear long sleeves.
In the cap box I have a spare nipple and the open notch rear sight that fits the dovetail on the barrel, which can be used in lieu of the tang peep sight. The latter allows you to shoot the rifle more accurately but it's harder to see through in low light, so I'd probably switch them out were I to take it hunting.
I haven't shot the rifle in years but it's time to take it out and let my 14 year old daughter give it a try.
The year was 1970 and I was two years old. We were visiting my paternal grandparents in Patchogue, New Yawk. My dad went to a local gun shop and came back with this Hopkins & Allen .45 caliber Heritage Model underhammer caplock percussion rifle.
The black powder revival of the 1960s and 70s was in full swing, and Numrich Arms of West Hurley, NY, owned the rights to use the old Hopkins & Allen name. They started making these simple designs with only two moving parts, the hammer and trigger. The trigger guard is a flat spring and acts as the hammer spring.
In 1981 my parents gave me the rifle as my bar mitzvah gift. (I am quite aware of how unusual that sentence reads.)
I loaded the rifle with 40 grains of 3Fg black powder and a .440" round ball patched with ticking. It is quite accurate out to 50 yards and I used it to win the first shooting match I ever entered.
Because the nipple screws directly into the barrel where the powder charge sits, ignition is very reliable and fast. There can be some spitting, though, so it's wise to hold your support arm off to the side and wear long sleeves.
In the cap box I have a spare nipple and the open notch rear sight that fits the dovetail on the barrel, which can be used in lieu of the tang peep sight. The latter allows you to shoot the rifle more accurately but it's harder to see through in low light, so I'd probably switch them out were I to take it hunting.
I haven't shot the rifle in years but it's time to take it out and let my 14 year old daughter give it a try.
My First Fire with Flint and Steel
I bought this steel years ago at Dixon's Muzzleloading Shop but today was the first time I made fire with it. It was made from an old file.
I cheated a bit and used char cloth bought from an eBay vendor, but now I'm ready to make my own. The char cloth is in the Altoids tin underneath the steel, while the flint shard is laying on some unraveled jute twine from Lowe's.
I held the char cloth on top of the flint and struck it a few times with the flint. The ember took hold quickly and I quickly moved it to the bird's nest. After a little gently blowing it exploded into flame, and I hurriedly dropped it into my fire pit.
You can see where I dispose of my cigar butts and the long matches I use to light my gas grill. ;)
Now I need to make up some of my own char cloth and find some punky wood to char.
I cheated a bit and used char cloth bought from an eBay vendor, but now I'm ready to make my own. The char cloth is in the Altoids tin underneath the steel, while the flint shard is laying on some unraveled jute twine from Lowe's.
I held the char cloth on top of the flint and struck it a few times with the flint. The ember took hold quickly and I quickly moved it to the bird's nest. After a little gently blowing it exploded into flame, and I hurriedly dropped it into my fire pit.
You can see where I dispose of my cigar butts and the long matches I use to light my gas grill. ;)
Now I need to make up some of my own char cloth and find some punky wood to char.
Friday, January 25, 2019
My George L. Dech Flintlock Pennsylvania Rifle
I've had this rifle since 2008 but only just got around to taking some good detailed pictures.
It can be a challenge to get a good, full length shot when the gun is 57 to 58 inches long.
Closeup of the lock and patchbox:
Closeup of the cheek piece with a vent pick underneath, some incising on the butt, and the lock bolt and side plate:
The front sight, which is brazed or silver soldered to the barrel:
Rear sight and the barrel's transition from octagon to round:
The ramrod entry thimble:
The trigger guard and toe plate. The button to open the patch box is visible in the middle of the toe plate.
The rifle started out as a left handed .50 caliber Dixie Gunworks Tennessee Mountain Rifle. George L. Dech, who was a gunsmith near Allentown, PA restocked it into more of a Lancaster, PA styled rifle in curly maple with brass furniture. He retained the original lock, double set triggers, the .360" diameter ramrod, and barrel. I replaced the ramrod with one that's a bit longer and with a brass tip threaded 10-32 for cleaning jags or other accessories.
One of the more notable features is how the barrel was turned from a full, 15/16" octagon profile to a 1/3 octagon and 2/3 round profile. This makes the gun much less muzzle heavy, although it is far from a lightweight piece.
The lock sparks very well and ignition is quick. It's a good shooter that I've taken deer hunting several times (although I've yet to bag one).
It can be a challenge to get a good, full length shot when the gun is 57 to 58 inches long.
Closeup of the lock and patchbox:
Closeup of the cheek piece with a vent pick underneath, some incising on the butt, and the lock bolt and side plate:
The front sight, which is brazed or silver soldered to the barrel:
Rear sight and the barrel's transition from octagon to round:
The ramrod entry thimble:
The trigger guard and toe plate. The button to open the patch box is visible in the middle of the toe plate.
The rifle started out as a left handed .50 caliber Dixie Gunworks Tennessee Mountain Rifle. George L. Dech, who was a gunsmith near Allentown, PA restocked it into more of a Lancaster, PA styled rifle in curly maple with brass furniture. He retained the original lock, double set triggers, the .360" diameter ramrod, and barrel. I replaced the ramrod with one that's a bit longer and with a brass tip threaded 10-32 for cleaning jags or other accessories.
One of the more notable features is how the barrel was turned from a full, 15/16" octagon profile to a 1/3 octagon and 2/3 round profile. This makes the gun much less muzzle heavy, although it is far from a lightweight piece.
The lock sparks very well and ignition is quick. It's a good shooter that I've taken deer hunting several times (although I've yet to bag one).
Saturday, January 12, 2019
Sling and New Front Sight on Cabela's Hawken
One rifle I've been shooting lately is my Cabela's Hawken, made in Italy by Investarms. At some point I'd like to take it hunting, which IMNSHO requires a sling. Being a more modern design than, say, my long rifle, I didn't mind mounting modern quick detach swivels.
I found this set by GroveTec at MidwayUSA which fit. I paired it with this Hunter carry strap. Installing the rear swivel required drilling a hole in the stock. The front swivel clamps around the lower ramrod pipe. Before installing it, I Loc-Tited the screw securing the pipe since I noticed it was loose already. I also Loc-Tited the Chicago screw holding the strap to the rear swivel. In my experience, thread locker prevents a lot of problems. I even put some on the inside of the part of the front swivel where it clamps over the ramrod pipe.
The other addition I made was to replace the Williams fiber optic front sight with a Lyman 37ML white bead from October Country. The dovetail for the front sight is .360" instead of 3/8" (.375"), which is more common in the US. The Williams sight never fit the dovetail that well and wasn't as secure as I'd like.
The Lyman front sight wasn't as good a fit as I wanted, either. I wound up dimpling the bottom of the dovetail recess to raise some metal and shimming it with a small piece of 600 grit wet/dry sandpaper. After the sight was in I staked the dovetail as well.
The new sight is a little shorter than the Williams it replaced, so I'll have to rezero the rifle. No biggie.
I found this set by GroveTec at MidwayUSA which fit. I paired it with this Hunter carry strap. Installing the rear swivel required drilling a hole in the stock. The front swivel clamps around the lower ramrod pipe. Before installing it, I Loc-Tited the screw securing the pipe since I noticed it was loose already. I also Loc-Tited the Chicago screw holding the strap to the rear swivel. In my experience, thread locker prevents a lot of problems. I even put some on the inside of the part of the front swivel where it clamps over the ramrod pipe.
The other addition I made was to replace the Williams fiber optic front sight with a Lyman 37ML white bead from October Country. The dovetail for the front sight is .360" instead of 3/8" (.375"), which is more common in the US. The Williams sight never fit the dovetail that well and wasn't as secure as I'd like.
The Lyman front sight wasn't as good a fit as I wanted, either. I wound up dimpling the bottom of the dovetail recess to raise some metal and shimming it with a small piece of 600 grit wet/dry sandpaper. After the sight was in I staked the dovetail as well.
The new sight is a little shorter than the Williams it replaced, so I'll have to rezero the rifle. No biggie.
Labels:
black powder guns shooting,
diy,
guns,
gunsmithing,
MidwayUSA,
October Country
October Country Universal Sling
Earlier this week, I ordered a Universal Sling from October Country, who caters to black powder shooters. I wanted a sling for my Cimarron 1873 Sporting Rifle that would be more secure than the Leatherman sling I used when I hunted with the rifle last month. (The Leatherman sling is extremely well made but the butt cuff doesn't fit the 1873 snugly and the only way to tighten it is with a cord or rubber band. I'll reserve it for my flintlock.)
OC's sling can be ordered for left or right handed shooters with the difference being which side of the butt stock the lacing is on. As a southpaw, I ordered a lefty sling.
It's primarily intended for muzzleloaders but as you can see below, it fits lever actions just fine.
It wraps around the barrel as shown below. There are two holes pre-punched in the strap so you can adjust it. I moved the lacing to tighten it up on my rifle.
The butt cuff has a slot for the strap in lieu of a swivel. Again, there are two pre-punched holes in the strap down below, allowing you some length adjustment without making modifications.
They also offer a two-tone version but I prefer the looks of the all-brown one.
I'm very impressed with the quality. All parts are made from good, thick leather, including the laces. This will make the rifle very nice to carry afield. For $28 and change it's a great deal. I'm tempted to order one for my 1860 Henry because the rear sling swivel popped off it again. On the Henry, I'd use the lacing to attach it to the front sling loop so that it doesn't interfere with the magazine follower.
Aside from the sling, I also ordered a couple French amber flints to try in my long rifle, a primitive forged turn screw to keep in my shooting pouch, and a Lyman 37ML front sight to put on my Cabela's Hawken.
I was also very pleased with October Country's service. A few minutes after I ordered I got a phone call from them asking if I'd changed my address. Apparently, there's another Dave Markowitz who had ordered from them. (I explained that was the evil one. ;) ) My ordered was placed Wednesday and it arrived here via USPS 2-day Priority Mail on Friday.
OC's sling can be ordered for left or right handed shooters with the difference being which side of the butt stock the lacing is on. As a southpaw, I ordered a lefty sling.
It's primarily intended for muzzleloaders but as you can see below, it fits lever actions just fine.
It wraps around the barrel as shown below. There are two holes pre-punched in the strap so you can adjust it. I moved the lacing to tighten it up on my rifle.
The butt cuff has a slot for the strap in lieu of a swivel. Again, there are two pre-punched holes in the strap down below, allowing you some length adjustment without making modifications.
They also offer a two-tone version but I prefer the looks of the all-brown one.
I'm very impressed with the quality. All parts are made from good, thick leather, including the laces. This will make the rifle very nice to carry afield. For $28 and change it's a great deal. I'm tempted to order one for my 1860 Henry because the rear sling swivel popped off it again. On the Henry, I'd use the lacing to attach it to the front sling loop so that it doesn't interfere with the magazine follower.
Aside from the sling, I also ordered a couple French amber flints to try in my long rifle, a primitive forged turn screw to keep in my shooting pouch, and a Lyman 37ML front sight to put on my Cabela's Hawken.
I was also very pleased with October Country's service. A few minutes after I ordered I got a phone call from them asking if I'd changed my address. Apparently, there's another Dave Markowitz who had ordered from them. (I explained that was the evil one. ;) ) My ordered was placed Wednesday and it arrived here via USPS 2-day Priority Mail on Friday.
Sunday, January 06, 2019
Neatsfoot Oil as a Patch Lube
My preferred lube for several years has been Track of the Wolf's Mink Oil, which is actually more of a grease. It's what I used last week when zeroing the Lyman peep sight I installed on my Cabela's Hawken.
However, I recently read on the Muzzleloading Forum and the American Longrifles Forum about using neatsfoot oil as a lube when shooting patched round balls. A couple guys reported being able to shoot all day with no swabbing between shots. Neatsfoot oil is good to have around for treating leather and it's cheap enough, so I figured it would be interesting to try.
On Thursday I took delivery of a quart of Fiebing's 100% pure neatsfoot oil from Amazon. The first thing I did with it was treat the sling on my 1860 Henry. It slightly darkened the leather and softened it noticeably.
Today I took the Hawken back to the range with 30 ticking patches pre-soaked in the neatsfoot oil.
It was in the upper 40s but not ideal for shooting round balls since it was very windy. As you can see from the target, accuracy was very meh. The wind was definitely a factor in the group, as was the varying light on my front sight.
On the other hand, I was able to load 30 shots without any swabbing. The last shot loaded as easily as the first.
On the gripping hand. there was a nasty ring of crud down in the breech that really grabbed my cleaning patch until I floated the bore with some Windex to dissolve it.
So, in conclusion, I haven't concluded if neatsfoot oil is a good patch lube in this rifle. I need to experiment with different powder charges, maybe .495 balls, and a thicker patch.
However, I recently read on the Muzzleloading Forum and the American Longrifles Forum about using neatsfoot oil as a lube when shooting patched round balls. A couple guys reported being able to shoot all day with no swabbing between shots. Neatsfoot oil is good to have around for treating leather and it's cheap enough, so I figured it would be interesting to try.
On Thursday I took delivery of a quart of Fiebing's 100% pure neatsfoot oil from Amazon. The first thing I did with it was treat the sling on my 1860 Henry. It slightly darkened the leather and softened it noticeably.
Today I took the Hawken back to the range with 30 ticking patches pre-soaked in the neatsfoot oil.
It was in the upper 40s but not ideal for shooting round balls since it was very windy. As you can see from the target, accuracy was very meh. The wind was definitely a factor in the group, as was the varying light on my front sight.
On the other hand, I was able to load 30 shots without any swabbing. The last shot loaded as easily as the first.
On the gripping hand. there was a nasty ring of crud down in the breech that really grabbed my cleaning patch until I floated the bore with some Windex to dissolve it.
So, in conclusion, I haven't concluded if neatsfoot oil is a good patch lube in this rifle. I need to experiment with different powder charges, maybe .495 balls, and a thicker patch.
Labels:
black powder guns shooting,
guns,
guns shooting,
hawken
The Twelve Apostles of Musketry
In the pre-flintlock era, before the invention of paper cartridges, it became common for musketeers to carry pre-measured powder charges in wooden bottles hanging from a bandoleer. They have come to be known as the "12 apostles," after the Apostles of Jesus. (In my quick research, the term may actually be more modern and not in use in the 17th Century. Regardless, it's in use today.)
Regardless, many modern muzzleloading shooters like to pre-measure their powder charges before heading afield or to the shooting range. There are numerous "quick loaders" available from the usual black powder shooting suppliers, but I found a cheaper alternative:
The modern apostles in the picture are 10ml centrifuge sample tubes with snap caps. Each has 70 grains of Goex FFg black powder in them, which occupies about 5.5ml. So, there is plenty of space in them for hunting loads in my rifles, which will be under 100 grains. I bought a bag of 50 of the tubes from Amazon for $10.39 on Prime. 15ml tubes should handle hunting loads for almost any muzzleloader.
Regardless, many modern muzzleloading shooters like to pre-measure their powder charges before heading afield or to the shooting range. There are numerous "quick loaders" available from the usual black powder shooting suppliers, but I found a cheaper alternative:
The modern apostles in the picture are 10ml centrifuge sample tubes with snap caps. Each has 70 grains of Goex FFg black powder in them, which occupies about 5.5ml. So, there is plenty of space in them for hunting loads in my rifles, which will be under 100 grains. I bought a bag of 50 of the tubes from Amazon for $10.39 on Prime. 15ml tubes should handle hunting loads for almost any muzzleloader.
Labels:
black powder guns shooting,
diy,
guns,
guns shooting
Subscribe to:
Posts (Atom)