One of the perks of having a father who is a S&W revolver aficionado but prefers Hogue grips, and who lives around the corner, is that he has a drawer full of OEM S&W revolver stocks. I was at my folks’ tonight for dinner and grabbed a set of K-Frame target stocks with the speedloader cut.
They show a good bit of finish wear but structurally they are solid. I previously had a set of Pachmayr Gripper Pro rubber stocks on the gun. Even with the exposed backstrap they were a little large for my small hands. The wood grips fit me better.
Before asking Dad if he had any of these gathering dust I looked on eBay and holy crap. Grips in this condition would probably bring over $100. NIB examples are closer to $180 now.
This Model 15 was the first good centerfire handgun I ever bought, and will be the last to go. It’s what I learned to be a competent pistol shot with. About 25 years ago I was at the range with Walt Rauch and he put a cylinder through it. As he handed the gun back to me he said, “Yup, the K-Frame is G-d’s gift to handgunners.”
Over the years, I've owned several multitools from Gerber, Leatherman, and Victorinox. However, for my needs I've found that a Swiss Army Knife is far more useful and easier to carry.
For my needs, a SAK is also more useful than a pocket knife that's just a knife. I use the other tools on a SAK as much or more than the cutting blade.
I've carried several SAKs, starting with a Victorinox Pioneer that I bought around 1981 for $13 at Herter's Cutlery at the King of Prussia Mall. (This was the first knife I bought and I still have it.)
One thing I haven't cared for is how SAKs eventually wear a hole in my pants pocket. I've found a couple solutions to that.
The first is attaching the knife via its keyring to a short lanyard looped around a belt loop. I made the lanyard just long enough to hold the knife vertically in my pocket. The lanyard has a plastic clip that allows me to easily detach and reattach the knife to it. Naturally, this requires the use of both hands but the SAK needs that to open any of the blades or tools anyway.
More recently I discovered the SwissQlip, an add-on pocket clip for most 91mm SAKs. (Check the list of supported SAKs at the link.) It attaches to the knife using the keyring's mounting hole, after you remove the ring.
I installed one on a Victorinox Fieldmaster. Small screws like the SwissQlip's attachment screw often have a tendency to loosen, so I put a drop of blue Loctite on it before screwing it in.
I've been carrying the Fieldmaster fitted with the SwissQlip now for a couple months and it works well, with a couple caveats.
First, it does block easy access to the tweezers. To get the tweezers out you need to use the toothpick to pry it up to the point where you can grab it.
Second, it also blocks access to the package hook unless you use something else like a small screwdriver to pry it open. This I don't care about since I have never used the package hook on any of my SAKs.
I'm willing to put up with these two things because overall the SwissQlip makes the SAK easier to carry. It's held securely to my pocket and has just the right amount of tension to keep it in place while still remaining easy to reinsert into my pocket.
I haven't found that the SwissQlip gets in the way when using the knife.
At $20 it's not exactly cheap but it is well made and functional. It's a worthwhile addition to a SAK.
I ordered this shoulder holster for my Cimarron Model P last week from an Etsy shop. I was originally planning to get something from El Paso Saddlery but their lead time is months and this was worth a shot for something more readily available, and for under $100. (I have no affiliation with the seller.)
The reason I wanted a shoulder holster is that due to my body type, belt holsters tend to drag my pants down. (That's a fancy way of saying I have a beer gut and no butt.)
It came in today and for the money I’m quite pleased. The ammo holder was a separate item. It’s intended to be worn on a belt but I’m planning to keep it on the shoulder strap, similar to how the WW2-style shoulder holster for my Victory Model was setup. The .44-40 rounds are very tight in the cartridge loops, so I’m going to leave the rounds in there to see if the leather stretches a little. I may put some neatsfoot oil on them.
The shoulder strap has holes punched in it for length adjustment, and it's secured with a Chicago screw. I’m going to add a second one to keep the excess from flapping and for extra security. I’ll give the whole thing a coat of Snow Seal or Montana Pitch Blend leather dressing. The fit of the gun in the holster is very snug. It carries vertically and there’s a hammer loop for additional security.
Maker's mark stamped on the back:
I might add a leather loop to secure the bottom of the holster to my belt to ensure that the rig stays in place when I draw.
A couple weeks ago I ordered a Cimarron (Uberti) Model P in .44-40 with a 5.5” barrel. It arrived at my local FFL and we did the transfer yesterday.
I strongly considered getting a 4-3/4” barrel, but decided on the 5.5” barrel because of my presbyopia. For me the front sight is a bit easier to see on the longer barrel, especially if I’m shooting indoors under florescent lighting.
My new gun has the “black powder” or “old model” frame, which requires the use of a screwdriver to remove the cylinder. Uberti thoughtfully includes a spare base pin retaining screw. I would have preferred a Pre-War frame with the more familiar spring loaded base pin catch but nobody had them in stock.
I should note that this gun has the original Colt-style lockwork. The only safety is the two-position base pin, and you hear four clicks when you cock the hammer.
The Uberti Bisley in .44 WCF that I got last year is a great shooter, but I find that it’s easier to quickly get a good firing hold on the SAA-style plowhandle grip than with the Bisley grip. What would be really cool would be one of these with a Bisley hammer, which is lower so it’s easier to recock the hammer.
I’m already well stocked with loaded ammo and components for .44-40, so the availability or lack thereof of ammo at gun shops not a concern.
Before shooting any gun that's new to me I field strip, clean, and lubricate it. New guns come with an anti-corrosion coating but it's usually not a good lube, and in any event, you want the bore clean. Aside from that I painted the front sight with some high-visibility green paint. Not very 19th Century, I know.
I was able to shoot the new revolver last night, and I'm extremely pleased.
The action is very smooth with a great trigger pull. I haven’t put it on a trigger scale yet but I’m guessing it’s about 3 - 3.5 lbs. and crisp. The one-piece walnut grip doesn’t have the typical red color Uberti puts on many of their guns, and fits my hand perfectly. (I have small hands so I’ve always like the 1851-Navy type grip, which is found on the Model P.)
At least on the indoor range under florescent lighting, the gun shoots a little low for me when fired with two hands. However, if I shoot with one hand it hits dead-on. Windage is perfect. I shot .44 WCF handloads consisting of a 200 grain RNFP soft cast bullet from cowboybullets.com on top of 8.3 grains of Unique. I want to try it also with some lighter loads, e.g., 7.0 - 8.0 grains of either Unique or Universal. I’ll also try it with black powder.
(I also got to shoot a Colt King Cobra. Nice gun but the DA sucks compared to S&W DA revolvers. I'll stick with my K-Frames.)
There's one thing I'm not happy with, and that's the typically soft screws that Uberti uses on their firearms. Thankfully, they were not so tight that I couldn't get them out (a problem I've experience on other Ubertis), but some show slot deformation even before I touched them. IOW, they came that way from the factory. So, once I get confirmation that it's in stock, I'll be ordering a complete set of correctly hardened screws from VTI Gunparts.
Aside from recreational shooting this will see service as a woods gun. So, I need to get a suitable holster. I’ll probably order a M-1942 Tanker holster from El Paso Saddlery. Based on my prior experience with a Tanker holster for other guns it should be comfortable.
A couple weeks ago I placed an order for 500 .430" 215 grain RNFP bullets from Matt's Bullets. They arrived today.
L - R in the pics below: Matt’s .430 215 grain RNFP, Accurate Molds 43-215C 219 grain RNFP, Desperado Cowboy Bullets 200 grain RNFP.
You can see that the bullet from Matt's has a shorter ogive with a wider meplat than the 43-215C. This may improve performance on game.
The lube on the Matt's bullet is Carnauba Red. This works great with smokeless powder but as far as I know isn't suitable for black powder. The 43-215C is lubed with my homebrew 50/50 beeswax/mutton tallow mix. It's outstanding for black powder and smokeless (at least at mild velocities). The DCB bullet on the right appears to be cast from a Magma mold commonly used by commercial casters. It supposedly has a black powder compatible lube, but it doesn't carry enough of it for use in a rifle.
All three bullets are soft, around 11 - 12 BHN. This allows them to bump up and fill the bore on my guns as long as they aren't sized too small. They don't cause leading in my guns with my loads.
I loaded 50 of the Matt's bullets in virgin Starline .44 WCF brass on top of 8.3 grains of Alliant Unique tonight. I'm looking forward to seeing how they shoot.
Assuming they shoot well, I will probably reach out to Matt to see if I can purchase a batch as-cast, with no lube and not sized. I'll then size them to .430" and lube them with SPG so I can shoot them on top of black powder. It would be nice to have a commercial alternative to the AM 43-215C that I can load on top of BP, for when I don't feel like casting to replenish my supply.
Last week I took stock of my .44-40 ammo stash and decided that it was lower than I wanted. I have plenty of components, so I got to work. Since Thursday, I put together 250 rounds:
100 full power black powder loads (Accurate 43-215C bullet on top of 2.2cc of Scheutzen 3Fg)
50 .44 Henry rimfire-equivalent loads (same bullet but 1.9cc of powder, with a 1/8" thick nitro card in between to take up the air space)
100 smokeless loads (200 grain RNFP from Desperado Cowboy Bullets on top of 8.3 grains of Alliant Unique)
The smokeless loads should push the 200 grain bullet north of 1,200 FPS from a 24" rifle, a bit less from a 20" carbine, and somewhere in the 900s from a revolver.
I also put together 3 functioning dummies in Starline cases with the DCB bullets sized to .430" (as they came from DCB). Previously, I'd sized them to .429". They feed and chamber just fine in all my .44 WCF guns so that's one less step I need to take with the second box of these bullets I have. I'm hoping that they'll give better accuracy as well. Groups in the rifles have been mediocre although my Uberty Bisley shot them well.
After wrapping up I ordered a 500 count box of 215 grain .430" RNFP bullets from Matt's Bullets. The design looks very similar to the Accurate Molds 43-215C so I am hoping they shoot as well. Unfortunately, they are lubed with Carnauba Red. This is an outstanding bullet lube for smokeless powder but it's not suited for black powder AFAIK. So, they'll be reserved for loading on top of Unique, Reloder 7, IMR-4227, or Herco if I can find a pound at a reasonable price.
Loading the 150 black powder rounds mostly depleted my stash of 43-215Cs, so it'll be time to cast soon. After I cast a bunch I am planning to borrow my brother's RCBS Lube-A-Matic to size them at .430" and lube them with SPG, which should be quicker than pan lubing them.
Yesterday I got the Interarms 65 to my club for the first time and tried a few different loads at 50 yards from the bench.
The first was a 200 grain RNFP from Desperado Cowboy Bullets on top of 8.5 grains of Unique. Accuracy was poor. I'll have to try both lighter and heavier charges to see if I can get them to group. Or, it might be that the rifle simply doesn't like the DCB bullet.
I ran a couple patches wet with Ballistol followed by a couple dry patches through the bore before proceeding.
Next up was my .44 Henry rimfire-equivalent load. This is 1.9cc of 3Fg black powder, a 1/8" thick nitro card to take up air space, and a 219 grain bullet cast from an Accurate Molds 43-15C mold. This gave pretty good accuracy. The flier was my fault.
Finally, I shot some of my full power .44 WCF: 2.2cc of 3Fg Swiss BP, no wad or card, and the same 43-215C bullet. Accuracy was on par with the Henry-equivalent load, with noticeably more smoke, noise, and recoil.
I put 30 rounds loaded with black powder through the rifle. I cleaned it before leaving the range using patches wet with a Ballistol/water mix (mostly water). The 5th patch came out clean. Because .44 WCF brass seals the chamber so well, no fouling got back into the action.
Between working the action at home and shooting it, plus the internal work we did, the action is slicking up nicely.
I might have to take this into the woods this Fall.
Lever action rifles function best when you work the action authoritatively. Some more so than others, for example my Interarms 65 (a rebadged Rossi 92) really needs to be worked like it owes you money. That can be hard on your fingers, so something that cowboy actions shooters have created is a lever wrap made from leather (or paracord if you want a more tacticool look).
So, the other day I ordered a D4 Guns Lever Wrap Kit. it includes materials for doing two levers, so I wound up putting one on the Interarms and the second on my Cimarron 1873 Sporting Rifle.
The included instructions are OK but D4 Guns has an excellent video on how to do the stitching, which I recommend. Click here.
Here are a couple views of the Interarms Rossi:
And the 1873:
One downside is that they aren't easily removed in case they get wet. You'd have to cut the stitching and redo it. The thread is artificial sinew, like this stuff.
Back in May I picked up an Interarms Model 65 carbine in .44-40. It's simply a rebadged Rossi 92, which is a replica of the Winchester 1892.
The blueing is nicely done and a deep, blue-black. The wood has a dark stain that I like better than the light color of more recently produced Rossis. Wood-metal fit is acceptable.
The exterior condition and the bore are excellent, however the action was rough. This rifle was probably made in the early 1990s, long before Rossi bought new CNC machinery. Not much of attention was paid to the internal fit.
One nice touch is that a prior owner installed studs for quick detach sling swivels. They will come in handy. I ordered a Hunter Company #220-1 1" carrying strap for it. I have one on my Cabela's Hawken and like the simple design.
As typical of Rossi 92s it was oversprung. I installed reduced power springs for the hammer and ejector from Steve's Gunz.
Disassembly wasn't difficult with the assistance of documents found online and a couple YouTube videos. Reassembly, on the other hand, was a BITCH. This past weekend I enlisted the assistance of my friend N. who aside from being a shooter, is a mechanical engineer by training and generally the handiest guy I know.
Aside from fiddling to get it reassembled, we also had to debur the ejector and ejector collar. The action is much smoother than it was when I got it but to feed properly you need to work it like it owes you money. I think as it gets shot more it'll get even smoother. Since I work from home I've been leaving it out and cycling the action several times when I take breaks during the day. I've already noticed that the carrier is working better. (The action is well lubricated with oil and white lithium grease in spots.)
After we got it back together we ran 31 rounds of my black powder, .44 Henry-equivalent handloads through it shooting at a gong. That load is 1.9cc or ~28 grains of 3Fg BP, a 1/8" thick nitro card to take up air space, and a 219 grain bullet cast in an Accurate Molds 43-215C, all in a Starline case. Primers were CCI.
With the reduced power ejector spring the cases cleared the rifle easily but landed near my feet, instead of being launched several yards. The reduced power spring also make fully closing the action easier.
I'd forgotten to bring a bottle of moose milk with me so I just ran a patch with some Ballistol on it through the bore while still at N.'s, then finished cleaning it at home. I first wet brushed the bore and then after about 8 patches they came out clean. There was zero black powder fouling in the action because the thin .44-40 brass seals the chamber so well.
I'm planning to bench the rifle and see how it does at 50 and 100 yards. Because the 1892 and replicas have very strong actions, I might load up some +P loads (taking care to keep them out of my other rifles). I'm not going to get too crazy because at about 5.5 lbs. with a steel buttplate, anything much hotter than a standard .44-40 load is going to suck to shoot. (I did not particularly enjoy shooting my Marlin 1894 .44 Magnum with full power loads, and eventually sold it off.)
Rossi currently sells the 92 chambered for .357 Magnum, .44 Magnum, and .45 Colt. You can sometimes find them in .44-40; I found this one on Gunbroker and had it shipped to a local FFL for transfer.
Due to the simpler and easier to maintain design, if I was limited to one I might prefer a Winchester 1873 over the 1892 for a long-term survival rifle. But there's nothing handier than an 1892 carbine and it's a still very viable choice especially since the Rossis are much less expensive than the Uberti or Winchester 1873s.
Key points from President Potato Head's speech this afternoon:
-We were never there for nation building. (Bullshit. That was a clear aim from the get go. IMO that was always a mistake but let's not deny history.)
-"I opposed The Surge."
-Trump's Fault!!!!111!!!
-Threw allies under the bus.
-Threw Obama under the bus.
-Terrorism world-wide, so if we leave Afghanistan it's no biggie. (Hey fuckstick, how about that WIDE OPEN southern border?)
-Human rights must be the center of US foreign policy (but our policy will be toothless).
-The Taliban doesn't have an air force. (Yo dumbass, you just gave them one!)
-Failed to address all the equipment we left behind, from M4 Carbines to Hummers and drones, which now are in the Taliban's hands.
-This is not in our national interest. On this point I mostly agree, Afghanistan is an uncivilized shithole. That said, there was no planning for an orderly withdrawal that secured our assets and allies.
-"The buck stops with me." (But the current situation is everyone else's fault.)
-No questions, not even anything vetted ahead time.
Now he's going back to Camp David.
~~~~~~~~~
We did the same thing in Afghanistan that we did in Vietnam in the 1970s: We pulled our air support for indigenous ground forces, after which they shortly collapsed.
The shotguns that I shoot the most lately are a Remington Rolling Block single shot that was converted from a Swedish military rifle, and a Baikal MP-310 over-under. The Remington is a 20 gauge with a 2.5" chamber while the Baikal has 12 gauge 3" chambers.
Most of the ammo I've been shooting has been black powder handloads with fiber wads in Magtech all brass shells. The Remington is a BP-era gun but of course the Baikal is proofed for smokeless. The main reason for using fiber wads is because my shooting has been on a friend's property and he doesn't want a bunch of plastic wads littering his field when we shoot clays.
One reason I like loading BP shells is that it's simpler. I don't need to worry about specific wad/powder charge/hull/shot load combinations. I prepare "square loads" using an equal volume of powder and shot, as is done with muzzleloading smoothbores. In 20 gauge that means using a Lee 4.3cc dipper to give me ~62 grains of powder and 7/8 oz. of shot. I have also used that for 12 gauge, which gives a light kicking load that will still bust clays if I do my part.
Pyrodex can be loaded similarly.
Cleanup is a bit more involved with BP than smokeless, but because you're dealing with a smoothbore is not onerous. I use a nylon bore brush wet with water to break up the fouling, then sweep it out using a cotton flannel patch using the brush as the jag.
If you use Pyrodex, be advised the fouling is actually more corrosive than BP fouling, so be extra careful when cleaning.
One way to speed cleanup is after say, 25 rounds of BP loads, is to shoot a smokeless trap load through the barrel. This blasts out almost all of the BP fouling.
If you're wondering how removable choke threads might be fouled, in my experience it's not a problem. AAMOF, tonight I pulled the choke tubes from my Baikal over a week after having put 50 BP rounds through it. The choke tube threads had been generously lubricated with white lithium grease. There was no sign of corrosion, and indeed no sign of fouling on the threads.
Naturally, if you run BP or Pyrodex shells through a gas operated gun, you're looking at a complete teardown afterwards. For break open guns or even pumps, cleaning isn't bad. I imaging that bolt action shotguns wouldn't present problems when cleaning afterwards, either.
Rather than the method of priming by driving the case down onto the primer, I also have two antique tools for repriming, one for each gauge. I've found that they work better for seating No.209 primers in modern hulls than they do seating large pistol primers in the Magtech cases. The Magtech brass seems to have tight primer pockets. That's OK, IMO, because it means they'll take longer to expand and become useless.
The antique priming tools were purchased via eBay. 12 gauge tools are pretty common but the 20 gauge are less so. I had to setup a search with automated email notifications to finally get ahold of one.
Anyway, I have a brick of Winchester 209 primers and about a hundred Remington 20 gauge empties, so yesterday I decided to trim them to length so they'll chamber in the Rolling Block, and prime them.
That was easier said than done. I trimmed them using a pipe cutter with the case slipped over a dowel for support, but it's not really sharp enough, so I had to finish each case with my Swiss Army Knife.
So last night I placed an order with Ballistic Products, Inc. for their Trim Doctor tools, which is designed to easily cut plastic shotgun hulls using a utility knife blade as the cutter. This should work better than the pipe cutter.
While I was giving BPI some money, I also ordered a bag of 500 Federal once-fired 12 gauge hulls, and suitable wads and cards for reloading both 12 and 20 gauge plastic hulls with BP and non-plastic wads. (Plastic hulls have a smaller inside diameter than the Magtech hulls so I need different wads.)
Black powder loads are hard on plastic hulls so I'm expecting to get only 1 or maybe 2 shots per hull. That's fine because using them means I don't need to worry about rinsing and tumbling them, unlike the all brass cases.
If you like black powder and you like shotguns, combining the two is fun and easy.
I recently learned of the Konyak Naga hill tribe of northern India and Mynamar (Burma). Apparently, guns are a big part of their culture and they make them themselves.
The Konyaks' guns seem all to be single or double-barreled muzzleloading shotguns with percussion locks. They make their own powder and caps.
There are a couple Youtube channels with information about the Konyak Naga gun culture that I've been watching lately.
This video has an overview of their gun culture:
Target shooting at a pig's skull suspended from a tall pole (apparently the object is to cut the string holding the skull):
And this one shows how they make percussion caps:
Finally, this video shows how they make gun powder:
I find this fascinating just because I am into black powder and muzzleloaders, but it also gives a glimpse of what's possible with primitive tools, a lot of skill, and patience.
The current crazy ammo supply situation has even extended to black powder shooting supplies, including percussion caps. Although I was able to pick up a 1200 count sleeve of RWS 1075+ caps from MidwayUSA earlier this year, I wanted a fallback option as well. So, in early January I ordered a #11 cap maker and a packet of Prime All from 22lrreloader.com. It took about a month to come in due to their backlog.
After the cap maker came in I punched out about 100 cups. I am able to do so by hand but it's much easier using a mallet.
Anyway, the cups sat until yesterday. Instead of using the Prime All compound, I charged about a dozen with some Scheutzen 3Fg black powder topped with two toy caps, secured in place with a drop of Duco cement. It's a nitrocellulose laquer that acts as a binder, waterproofing agent, and is flammable.
I used a scoop made from a large pistol primer cup glued to a piece of bamboo from a chopstick to put the black powder in the caps.
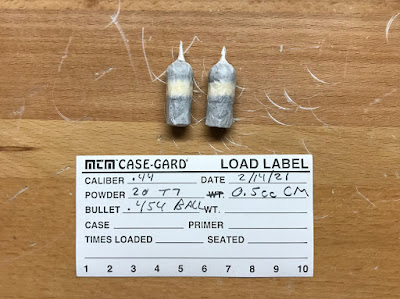
Last night I tried the caps in my Euroarms Rogers & Spencer. I used them with Triple 7 as the main charge. I wanted to see how they'd do with a propellant that has a higher ignition temperature than black powder.
They worked pretty well. The first cylinder was charged with 20 grains by volume of Triple 7 3Fg, a lubricated wad, and .454 ball. All chambers ignited easily and the caps didn't fragment.
I then tried some paper cartridges with the same powder charge and ball but with 0.5cc of cornmeal filler. These must develop a higher chamber pressure, because I noticed that the gun was harder to recock due to the caps deforming more. Also, in this cylinder I had one misfire where the cap popped off but the main charge failed to ignite. It went off with a second cap but there was a noticeable delay. I think the nipple was clogged.
The Rogers & Spencer with my homemade caps on the nipples. I used a Delrin punch that I use for pushing out the wedges on Colt-style guns to seat the caps on the nipples. They are tighter than RWS 1075+ or Remington No.10 caps on these nipples.
I also shot two more cylinders tonight with 20 grains of Scheutzen 3Fg BP and RWS caps.
I regard this experiment as a success. I'm getting a 1/8" hole punch so I can more easily get the toy caps off the paper roll, which will speed production. I also need to try the Prime All compound.
Making percussion caps is tedious. I don't expect to make a whole bunch but I want to have the capability, just in case.
This video from Paul Harrell provides a good comparison between round balls and conicals in percussion revolvers (in this case fired from a Ruger Old Army).
A few comments:
The conicals he used appear to have been cast from a Lee mold. They are similar in form to modern round nosed bullets that have been loaded in cartridges since the late 19th Century.
Conical bullets used in cap and ball revolvers in the 1850s and 1860s were generally more pointed. This would increase penetration but reduce terminal effectiveness because the bullet would be more prone to slip through tissue rather than punching a larger diameter hole.
Nowadays, more effective conical designs are available, intended for hunting, e.g. Kaido Ojaama's design, which has a wide, flat meplat.
In his book Sixguns, Elmer Keith recounted that Civil War veterans that he knew as a boy stated that round balls were more effective for antipersonnel use than the pointed conicals of the period.
Today I finished up making another batch of paper cartridges for my .44 cap and ball revolvers.
For these, I used permanent end papers AKA curling papers for the tubes and the end caps. This paper seems a little easier to work with than cigarette rolling papers and is cheaper, under $5 delivered for a box of 1,000.
As before I used .454 round balls. The powder charge in this batch is reduced, however, at 20 grains of 3Fg Triple 7 measured using the 20 grain spout on my flask. Because of the lesser amount of powder, I added 0.5cc of cornmeal filler, to ensure that I get enough compression.
The first picture shows some rounds in various stages of construction. The top two in the leftmost row have been charged with the powder and filler, and have balls dropped in. The third one down has the powder and filler, while the 4th has the funnel from my Guns of the West kit inserted, ready for the cornmeal. Finally, the one on the bottom has powder only. (Click on each pic to enlarge.)
And two completed cartridges:
I've noticed recently a lot more interest online in making paper cartridges for percussion revolvers. I suspect that this is driven at least in part by the current ammo shortage situation, driving folks to take another look at their cap and ball sixguns to get some shooting in. Paper cartridges allow you to get a lot more shooting in during a range session than if you load with loose powder and ball.
In some of these discussions I've seen comments about how making the combustible cartridges is tedious. To a certain extent it is, which is why I break it up into batch jobs. I'll make up some tubes until I have 50. At a later time I'll get around to loading them. Done this way it's not really any worse than loading metallic cartridges on a non-progressive press. At least with this I don't have to recover, clean, resize, and decap my brass. The overall amount of work is probably less, in fact.
On Blackie Thomas’s YouTube channel he shows carrying a Pietta NMA Sheriff’s Model in a replica holster for the US M1917 revolvers. He got his from Sportsman’s Guide. I bought this one from Sarco for $25 + tax and shipping. The quality seems pretty good — nice thick leather and good stitching. There’s no indicator where it was made but I have a feeling it’s from India.
As received, with a Pietta 1858 Sheriff's Model in it. The flap cannot be buttoned.
So, I added an extension by riveting on a piece of leather. I got the color to almost match just by applying some neatsfoot oil.
With the extension added:
It also fits my Pietta 1851 Navy Sheriff, maybe even a little better than the Remington.
I used a Tandy rivet setter and rivets to attach the extension, after punching holes using a hollow punch from a Harbor Freight set. I did not punch the hole for the button in the extension until the new piece of leather was attached to the holster flap. I did it afterwards, after marking the correct spot.
Last week I ordered two Pietta Dance Brothers percussion revolvers from Jedidiah Starr Trading Co. in Michigan. I paid extra for two day FEDEX shipping and got them on Wednesday.
One is a gift to my father from my brother and I for his 80th birthday, while the second revolver was for me.
Both guns have "CC" in a box date code stamped on the frame. That translates to 2008, which means they have been sitting in stock for over a decade, which I found surprising.
The Pietta Dance revolver is a replica of guns built by the Dance Brothers in Brazos, Texas for the Confederacy during the Civil War. Only about 500 were made, mostly in .44 caliber. Some were in .36 caliber.
Original Dance revolvers were between the Colt Navy and Dragoon in size. As you can see from my pictures, stylistically, it resembles a Dragoon with the octagon-to-round barrel and straight cylinder.
Ian McCollum of Forgotten Weapons put out a nice video about the history of the Dance revolvers:
Mike Beliveau has a video in which he shoots a Pietta replica.
The most notable feature of the Dance revolver is that it lacks recoil shields on the sides of the frame, behind the cylinder. There are a couple of theories why the originals were made that way. One is that Dance felt that by omitting them the chance of cap jams was lessened. Another is that the frames were cut from iron or steel boilerplate, which was only thick enough for the frame without the shields.
The fit and finish of the Piettas is decent but not as good as my 1992-vintage Uberti 1851 Navy. I took down both of them. Removing the wedges took quite a bit of effort with a hammer and drift punch. After removal, I deburred the wedges and arbor slots.
I did a full, detail strip of both guns because they felt a bit gritty. Takedown is like any other Colt-type percussion revolver. While the guns were apart I took the opportunity to debur the internal parts, clean everything, and relubricated with Ballistol.
I lubricated the cylinder arbors and wedges with Bumblin Bear Grease from October Country. (I bought the jar of BBG on a lark a couple years ago. It works great but I'm not sure it's worth the price compared to Track of the Wolf's Mink Oil Tallow.)
With the mechanisms cleaned out and properly lubricated the guns cock smoothly.
The triggers have some creep but aren't too heavy.
The front sights are thankfully more like an 1860 Army than an 1851 Navy. The lever latch engagement is solid. The lever did not drop under recoil on my first range trip.
Last night I went along with Dad to his indoor range where we both shot mine.
I really like the gun, it’s a good shooter. This target is 18 shots, 1 handed at 7 yards. For ammunition we used combustile paper cartridges I'd made up ahead of time. The load was Hornady .454 ball on top of 25 grains of Swiss 3Fg, with no lube or wad. (The benefit of lube is to keep fouling soft in the bore. Chainfires are due to improperly fitting or missing caps.)
The lack of recoil shields makes it easy to cap and to see if you still have unfired chambers left. I'll note that if you do get a chainfire you'll likely get caps back in your face. Wear eye protection with one of these!
Dad’s cylinder was the last of the night, making 24 shots through the gun. By the end the gun was feeling a bit crusty and the cylinder didn't want to rotate without some manual assistance. I field stripped it for a quick clean before heading home (I'll do full clean today) and you could not see rifling. The fouling felt hard.
The gun has almost no barrel/cylinder gap so the arbor doesn’t get too badly fouled. I did wipe off the cylinder face and put a few drops of moose milk behind the cylinder, because it was getting sluggish.
I shot the first two cylinders with RWS 1075+ caps, the third with Remington No.10s, and the final with CCI No.11s. All worked fine but check this out:
Those are two RWS caps. I’ve never seen caps perforated in this way. Normally they bust wide open. The CCI and Remington caps fragmented normally.
Dad brought along a Nagant revolver with some 1978-vintage Soviet surplus ammunition. I put a cylinder through it. I find it remarkable that the Imperial Russian Army replaced the Smith & Wesson No.3 Russian with this clunker. Even the single action trigger pull is atrocious -- heavy and creepy. Given the choice, I'd take any one of my full sized cap and ball revolvers over the Nagant for anything other than punching holes in paper, including self defense.
After leaving the range, Dad came over for a bit of bourbon and conversation. All in all, a pretty darn good night.
We are forecast to get up to over a foot of snow and sleet here in Southeastern Pennsylvania. I just got inside from opening the locks to my sheds so they don't freeze shut, and putting gas in my snow blower. I keep gas in military surplus jerrycans.
This battery operated pump works really well for transferring gasoline from a can into the fuel tank of a generator, snow blower, or whatever without making a mess. I bought one in October and have used it a few times now. I wish I had one years ago.
This is a photo of the instruction sheet that came with Colt percussion revolvers in the 19th Century:
Click on the image for a full size picture.
Some things worth pointing out:
1. Colonel Colt referred to them as "pistols." Internet know-it-alls who insist that you shouldn't refer to revolvers as pistols, please take note.
2. "N.B." at the beginning of the second paragraph is an abbreviation for Nota Bene, Latin for Note Well. This is no longer a commonly used phrase and I've seen questions about it elsewhere.
3. N.B. ;) that you can safely load them with as much powder will fit under the projectile.
4. There is no mention of using wads or grease to prevent chain fires. As long as you are using a properly oversized ball or bullet, it will seal the chamber and you cannot get a chain fire due to flash over at the front of the cylinder. Chain fires are due to flashover at the rear of the cylinder, from loose or ill-fitting caps.
Today I put a new hand spring in my Euroarms Remington. I made it from a bobby pin and then soft soldered it in place, after widening the slot in the hand using a cutoff wheel in my Dremel tool.
Using soft solder will allow me to replace it if this one breaks.
I got the gun back together after much cussing — the hammer spring in it is really strong — and it seems to function ok.
When putting the gun away I noticed I had a small envelope in the box. I opened it up and found a set of spare screws. I must have ordered them at one time but totally forgot about them. Since Euroarms parts are now unobtanium, this was a really nice surprise.
I didn't get to the range today as I was hoping yesterday -- household chores took precedence. Hopefully the weather will be good for shooting next weekend.
I drove up to Dixon’s Muzzleloading Shop today. Their rifle and revolver selections were really picked over and they had no 3Fg left in stock (although a truck with BP is supposed to arrive on Monday). The only caps they had in stock were RWS 1075s, which were being rationed to one tin per day per customer.
One item they had was an Uberti Paterson revolver. It was the model with no loading lever. Unfortunately, the price tag was flipped over and I couldn’t see what they were asking for it. The store was busy so I didn’t bother them about it.
I ended up buying 15 grain and 20 grain powder flask spouts, a spout to fit the new plastic Goex powder cans, the current issue of Muzzleloader magazine, and the 2021 Dixie Gun Works catalog, plus two 100 count bags of Rush Creek .380 round balls.
After getting home I made up 50 cartridges for my Uberti Colt 1851 Navy. I’ve had a can of Hodgdon Triple 7 for a few years and decided to use up some of it. T7 supposedly loses potency after you open the can. However, it’s about 10 - 15% more potent than Goex to start with. When I’ve shot it in the past it’s been very easy to clean up afterwards.
For these cartridges, I used Zig Zag rolling papers for the tubes, with end caps from the Guns of the West kit I got recently.
One downside to this method of paper cartridge construction is that when using cast balls, it's difficult to ensure that the sprue remains facing upward when you drop it in. I expect accuracy to be fine for plinking or short range target shooting. For hunting or match shooting, swaged balls would be more consistent.
Last week I ordered 5 boxes of Hornady .454 round balls from Track of the Wolf. I got my order today, but only 1 box, with the rest cancelled, with a note that they cannot backorder balls.
So I checked out Midway. Hornady .454s are gone, no backorder. They did have Speer in stock so I ordered 10 boxes at $9.99 each.
That should keep me set for a while. I have a Lee .454 ball mold but it's either oversize or the alloy I used last time has some tin in it, because the balls dropped at .456 - .457. That's OK for my Ruger Old Army but unnecessarily hard to load in my Remingtons and Rogers & Spencer.
The online sources for black powder that I've checked have been depleted. I still have a decent supply from a bulk order from several years back.
Percussion caps have also been difficult to buy in the past couple of months. I was able to get a 2,500 count box of RWS #107+ caps last week from Midway, so I'm set for a while. Midway is now out of stock for all caps.
I'm still waiting to receive the percussion cap maker that I ordered at the start of the month from 22LRreloader.com.
I had such a good time shooting my Euroarms Remington with combustible paper cartridges yesterday that I decided to make up another batch tonight. I also picked up some MTM Case-Guard plastic ammo boxes for .44 Mag./.45 Colt. I use them for .44-40 and .38-40 but they work well for the .44 paper cartridges.
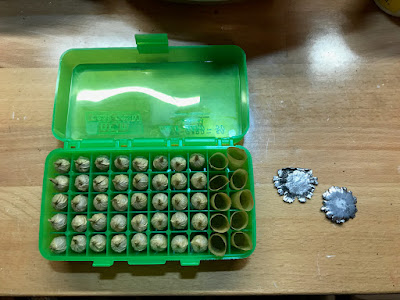
The two flattened blobs on the right are what a dead soft .454 ball looks like after impacting a steel gong from about 10 yards. I managed to salvage a few, which will be recycled into the casting pot.
The twist over the ball gives me a handle to pull them out. Unfortunately, I ran out of balls. I put 60 rounds through through the Euroarms yesterday, 36 paper cartridges plus 24 rounds of loose powder and ball, so I only had 40 balls left. Somewhere in my midden is a bag of 100 .454 balls but heck if I can find it.
I also tried casting some .454 last year in a Lee mold but when I shot them in my Euroarms Rogers & Spencer they were hard to load. I mic'ed them afterwards and they came out at .456 - .457, so I think there might have been a bit of tin in the alloy. I'm going to use up the rest of that lead by casting bullets for .44 WCF, then try the mold again with known dead soft lead.
Anyway, I have 500 Hornady .454 balls on the way from Track of the Wolf, although I need to give one box to my brother, who gave me this box.
I'm hoping to make a trip to Dixon's Muzzleloading Shop in the next week or two. It's worth the hour drive just to look around and hopefully I can pick up a pound or two of Olde Eynsford or Swiss 3Fg.
I shot the paper cartridges yesterday and also got to try some RWS 1075+ caps. Both worked great. Loading using the cartridges is much faster than with loose powder and ball. I'd smeared a bit of Bore Butter on the ball end of each cartridge last night and that helped keep fouling soft.
I had three varieties of cartridges:
1. Some made with the papers included with the Guns of the West kit, paper trimmed to length and glued to the ball.
2. Some with the same paper left full length and then twisted over the ball.
3. Some made from Zig Zag rolling paper, left full length and then twisted over the ball.
The cartridges with the full length papers twisted over the ball were easier to make and more robust. Going forward that's how I will make combustible cartridges. The Zig Zag papers aren't quite as wide as I want for .44 cartridges but should work well for .36s.
The paper did not completely combust but this did not impede subsequent shots.
The RWS caps were very hot and fragmented quite a bit. I did not get any cap jams with them. I also tried some CCI No.11 caps, which resulted in a few cap jams.
For the last cylinder of the day I used plastic ring caps sold for use with toy cap guns. They also worked fine with loose powder and ball (by that point I was out of cartridges). A few had to be pried off the nipples after firing, however.
Towards the end of the day I noticed that the hand was flopping back and forth in its slot, instead of being spring loaded. It's not uncommon for hand springs on the Italian Remington replicas to break, so that what I thought happened.
Today I detail stripped the gun for the first time and it looks like there never was a hand spring. WTF?
There should be a flat spring in that slot. The picture below shows a spare parts kit for Pietta 1858 Remingtons. The hand is to the left of the hammer.
My Euroarms revolver was made by Armi San Paolo, who went out of business in the early 2000s. Replacement parts are largely unobtanium.
After doing some research it looks like I can make a new hand spring from a bobby pin, so I bummed one from my daughter.
I'll post a follow up after I'm able to do some 'smithing.
During the 1850s and '60s, percussion revolvers were often loaded using combustible cartridges. This was especially true during the Civil War when both sides bought millions of them for issue to their armies. Originally, Colt's cartridges were made from foil but this proved troublesome and they switched to nitrated gut or paper.
Before the cartridges were constructed the gut or paper was soaked in a strong solution of potassium nitrate (KN03) AKA saltpeter. This helped ensure that the cartridge casing would burn as completely as possible.
Cartridges for .36 caliber Navy revolvers usually contained around 17 grains of powder and a ~145 grain conical. Those for .44 Army revolvers carried around 25 grains of powder and a 200 - 260 grain conical bullet.
However, loose powder and ball were also widely used. Revolvers sold on the civilian market often came with a mold which could cast one bullet and one ball. Powder was carried in and dispensed from a flask with a spout that could measure the right charge.
Usually the entire cartridge was loaded into the revolver chamber without first tearing it open to dump in the powder, or pricking the base through the nipple. This wasn't necessary for a couple reasons. First, on percussion revolvers the flash channel from the nipple is right at the base of the chamber so the flash from the cap will be strong. Second, the cartridges were tapered. When it was rammed home it ruptured and powder was exposted to the flash.
Several years ago I experimented with combustible cartridges made from cigarette rolling papers and they worked pretty well. I recently saw the kits sold by Guns of the Old West and available on Etsy. They include a forming mandrel, funnel/powder measure, a forming die, rolling papers, pre-cut cartridge bases, a glue stick, and a tube of bullet lube (50/50 beeswax and lamb's tallow), all in a nice plastic case. The mandrels, dies, and funnel are 3D printed.
I ordered a kit for making cartridges for my .36 and .44 caliber revolvers, and some extra papers. They arrived about a week later and I put together two dozen .44 caliber cartridges the other day.
The rounds I made are loaded with a Hornady .454 round ball on top of about 25 grains of 3Fg black powder.
The seller didn't include any instructions but he has a good video on YouTube demonstrating how to make the cartridges.
Basically, you make a tapered paper tube around the mandrel, glue on a base using the forming die, and cut the tube to length. After the glue dries you pour a measured amount of powder in and glue in your ball or bullet. The .44 mandrel has a 25 grain measure built in, while the .36 has a 17 grain measure.
I also tried using an empty .303 British case for a mandrel and found it easier to roll tight tubes on it. A 7.62x54R empty should work as well. The outside diameter near the base is perfect for a .454 ball. I then transferred the tube to the mandrel from the kit and used that to add the cap and trim to length.
Some pictures, first, some of the envelopes/cases while the glue dried:
I used a loading block to hold them:
Until I shoot them I'm keeping them in a small cardboard box.
I made some others using a slightly different technique. Instead of trimming the ball end I left it uncut and just twisted them over the top. I put a little glue on the excess material and then twisted it shut.
This is not period correct but has some advantages:
It’s less work.
It’s less mess.
There is enough room for a lube cookie or wad. I tried putting a wad in one but it’s too large and couldn’t get it to go in straight. A smaller diameter wad would work.
I could bump the charge to 30 grains.
The twist over the ball holds the projectile more securely, as I just proved to myself when I tried smearing some Bore Butter on the cartridges.
I'm planning to shoot them tomorrow in this Euroarms Remington Army.
Ever since I added a workbench to my home office, I've enjoyed tinkering with things inside, rather than out in my shop, where it's not climate controlled. The workbench has an LED light strip mounted on the bottom of the shelf that's attached to the backboard, but it doesn't give me good direct overhead lighting.
The lights have a magnetic base. I have this one stuck to the metal top shelf, but the set also comes with two adhesive-backed metal disks that you can use to mount them to non-magnetic surfaces. The lights run off standard 120VAC.
I'm planning to use the other one on my milling machine.
This blog contains Amazon affiliate links. If you buy something from Amazon.com after clicking on one of those links I'll get a small commission with no extra cost to you.